
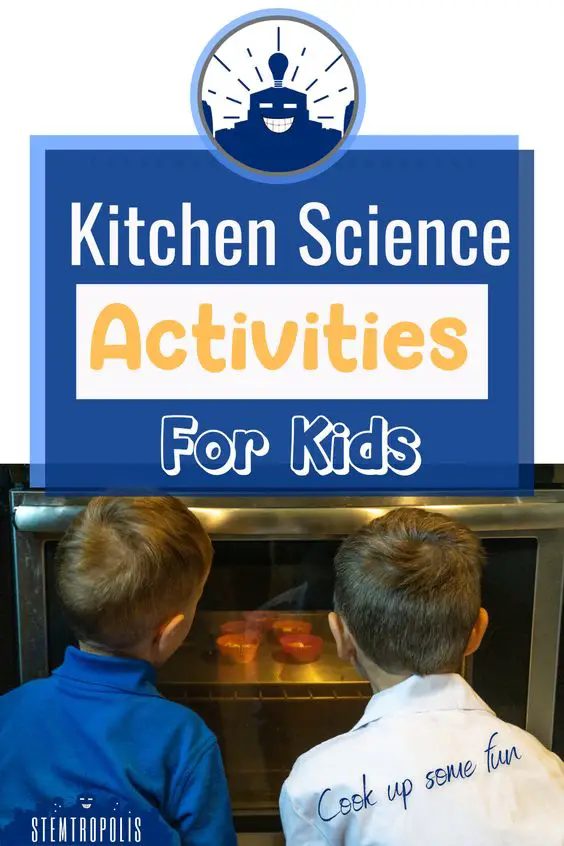
Cooking is always a fun activity for kids, and it’s something that parents and teachers can use to help explain Science, Technology, Engineering, and Mathematics (STEM) concepts. We want to share five simple steps on how to make cooking a STEM activity, and share our favorite kitchen science experiments.
If you’re looking for a way to teach children how to apply their STEM skills in an everyday setting, cooking is the perfect activity. Baking can teach young children basic chemistry and arithmetic, while kids can also learn about biology and agriculture through cooking.
Many parents struggle to find an activity that can help them connect with their kids while simultaneously learning. The good news is that cooking is one such activity, and we’ve put together five easy steps to set yourself up for and carry out a cooking lesson that will allow kids to apply their STEM knowledge. And for super busy parents, you can bond with your kids, squeeze in a lesson, and prepare a meal all in one activity. Let’s explore and get cooking!
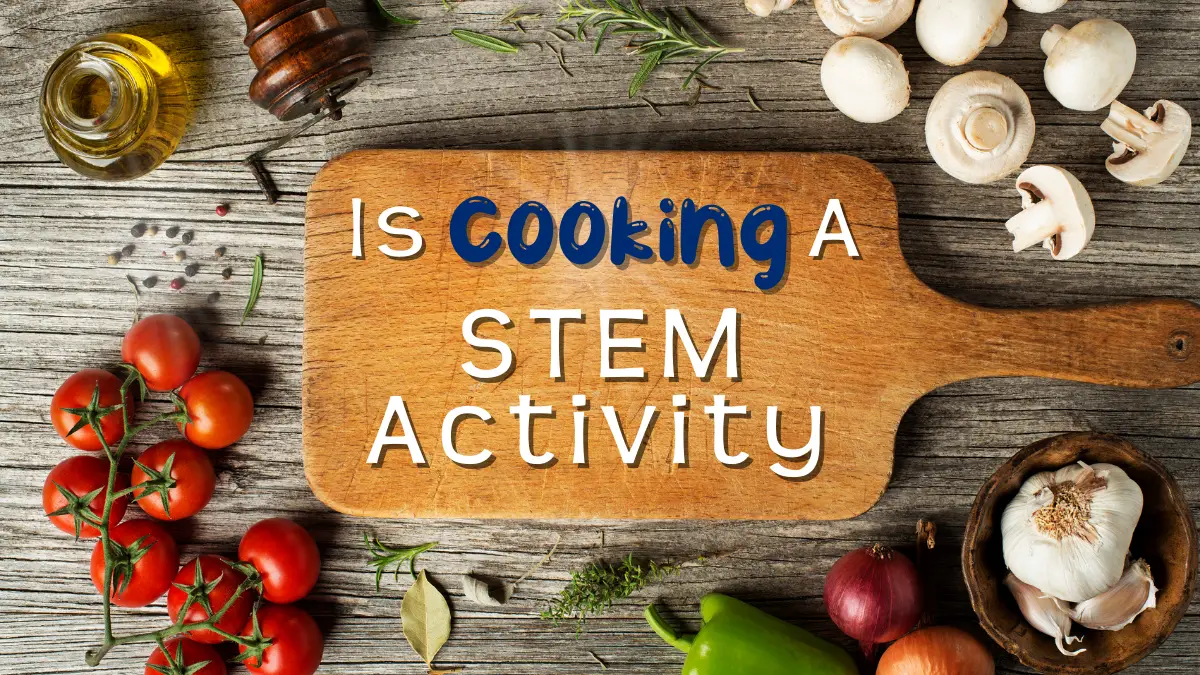
Making Cooking A STEM Activity
Kitchen STEM Activities (No Bake)
Kitchen Chemical Reactions
Baking STEM Activities
Food Science
STE(A)M and Cooking
Wrap Up – Cooking and Kitchen STEM
5 Steps To Making Cooking A STEM Activity
1. Prepare the kitchen
To get the most out of your STEM activity, you need to prepare the kitchen for cooking in a way that is suitable for learning. Position chairs or stools so kids have a good view and can get involved. For classroom lessons, try to have kids sit at their desks or tables or counters in a group or across from one another or you, the instructor.
Then you need to gather all of the ingredients and cooking apparatus (mixers, chopping boards, knives, spoons, whisks, measuring cups, pots, pans, ovenproof dishes, etc.) The kids can pick up, hold and observe the various appliances, ingredients, and dishes, and you can explain how they work. (Just be careful if you’re using sharp knives.)
Once your learning environment is prepared and you’ve taught your kid(s) some of the STEM concepts through observation, figuring out the chemical or electrical components of the ingredients and appliances, respectively, you’re ready to move on.
2. Read the recipe
This is especially helpful for young children who are still learning to read. Go through the recipe with them and teach them how to read new words. For older students, this is still helpful so they have an overview of the process and steps they’re about to perform.
Once you’ve read each step in the recipe, explain to the students why each step is conducted, how, when heat is applied, sugar crystallizes, or how baking powder makes a cake rise. Explain how eggs help with binding and how different flavors are combined with other ingredients.
Understanding how ingredients combine in a recipe can help children improvise later and adjust recipes to their preference, and understand how to apply these concepts to other recipes.
3. Measure ingredients
While this may seem a rudimentary task to you, young kids who are still learning basic arithmetic will be able to apply it when measuring out the ingredients. You can also discuss proportions with older students, explaining how different ingredients need to be combined in a balanced manner and the chemical reaction behind each ingredient’s contribution to the dish.
You can also work on math skills by challenging kids to rework the ingredients if you were to double the batch, or make half as much.
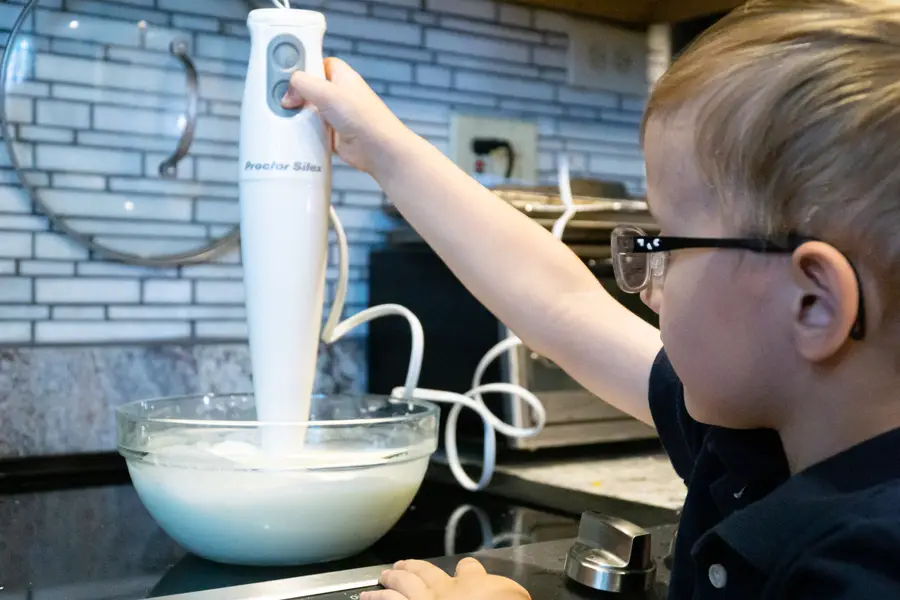
4. Cook (or Bake) your dish
Now for the true experiment. The best way to observe the chemical reactions that you’ve discussed up until this point is to get cooking. Regardless of whether you’re baking in an oven, frying with a pan, or using a food processor, you can explain how various appliances are used to combine, heat, or cool ingredients to create the chemical reactions that have been covered in your earlier instructions as well.
Make sure to observe the cooking process if you can. What happens to dry ingredients when you mix them together or add them to liquids. Do baked goods rise in the oven? Does food brown in the skillet? How does the dish change when exposed to a heat source? These are great jumping off points for lessons around science concepts.
5. Analysis (and Taste Testing)
Once your meal or dish has been cooked, you can show them the final results and cut it open to show what it looks like and how the ingredients have been cooked, baked, and/or combined.
From there, you can do taste tests where kids taste their own cooking (and each other’s meals if this is a larger group.)
What went well, and what didn’t?
Try our Kitchen Experiments book to keep track of your recipes and experiments. It’s designed to make notes and tweaks of what worked, what didn’t, and what to try next time to improve.
Fun STEM Cooking Activities and Kitchen Science
If you’re looking for ideas on dishes that you can get your kids to cook, here are several fun edible experiments that kids can carry out in the kitchen. Be warned of that sugar rush through!
For a warm up, here’s a few low prep kitchen lessons to try that don’t involve any baking or cooking; just some lessons with food items:
Oreo Moon Phases
A great, straightforward exercise for young kids is demonstrating the phases of the moon with Oreo cookies. By splitting the cookies apart and taking off some of the frosting, you can show kids what a full moon, half-moon, new moon, etc. look like – a great place to start when embarking on an education geared towards astronomy and astrophysics. (Or a great excuse to eat some Oreos – you decide!)
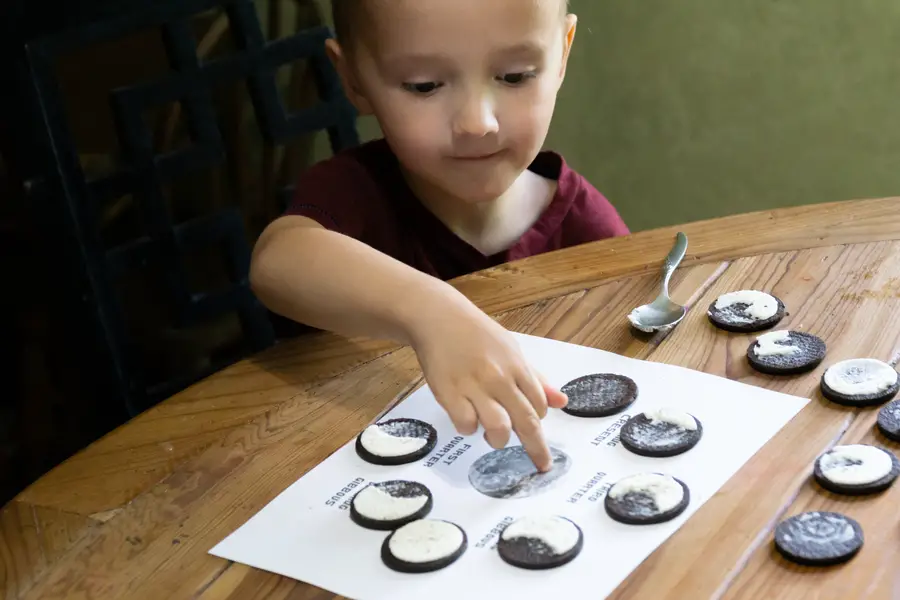
To arrange our Oreo moons, we used a sheet from our space printables pack – You can download it for free over on our Space Activities page.
Candy Atoms
Another great exercise is to use candy like M&Ms to construct atoms, with each piece of candy representing a compound, while the candy’s color represents which element it is. For example, suppose a blue M&M represents a hydrogen atom (H), and a red M&M represents an oxygen (O) atom. In that case, students can construct a water molecule by putting two blue and one M&Ms into a group (H2O).
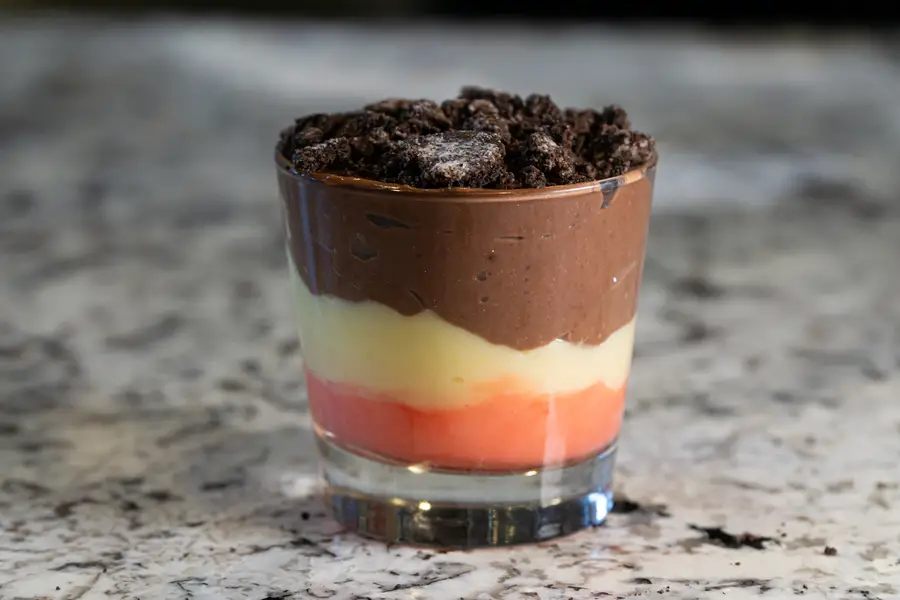
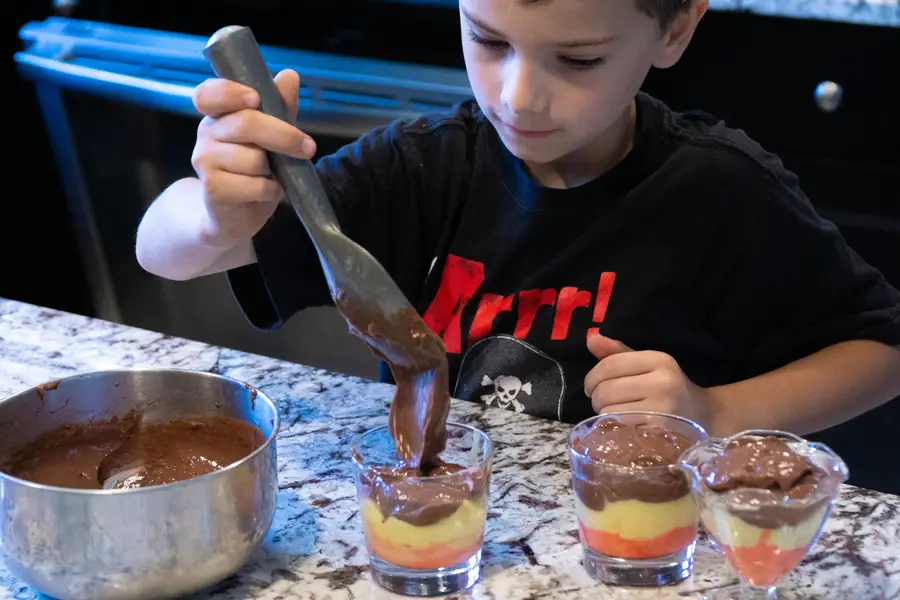
Edible Layers of the Earth
We used several layers of pudding and some crunched up Oreos to make a delicious geological model. We’re looking for 3 layers of pudding for the Inner Core, Outer Core, and Mantle, with the Oreos making up the crust on top.
You’ll need:
- Several Flavors of Instant Pudding
- Food Coloring (optional)
- Milk (for the pudding Mix)
- Oreos (we used some left over from our moon phases activity above)
- Several mixing bows and dessert cups
Once you’ve gathered everything you need:
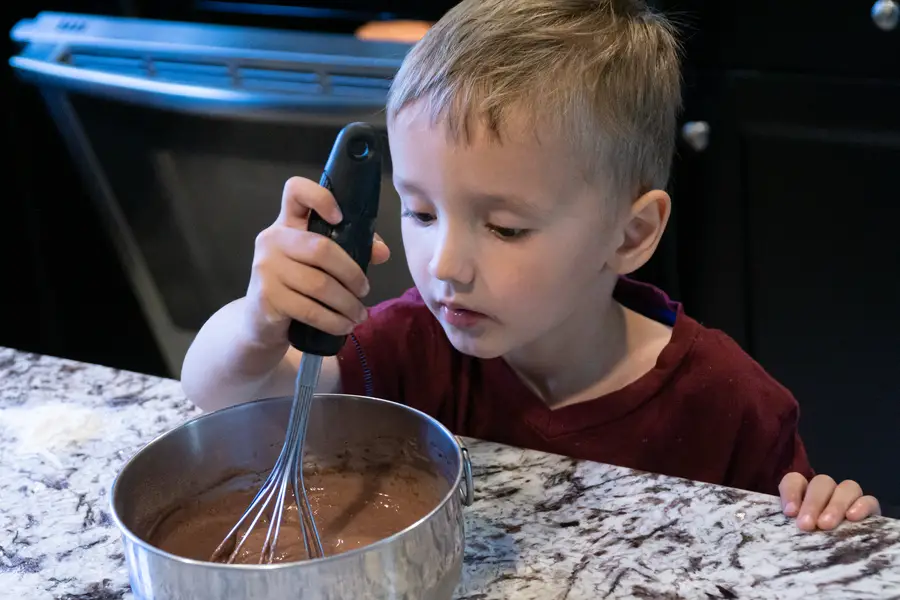

- In separate bowls, mix your pudding flavors. We used Vanila and Chocholate, and used some red food coloring in some of the vanila for the inner core.
- Once your pudding is mixed and starting to set, layer it into the dessert cups
- Crunch up the Oreos and sprinkle on top
- Enjoy!
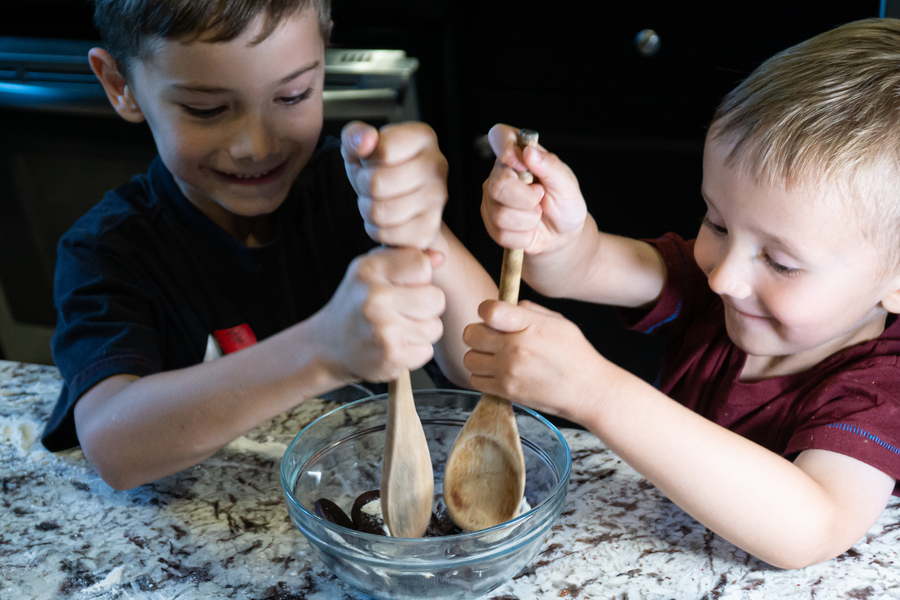
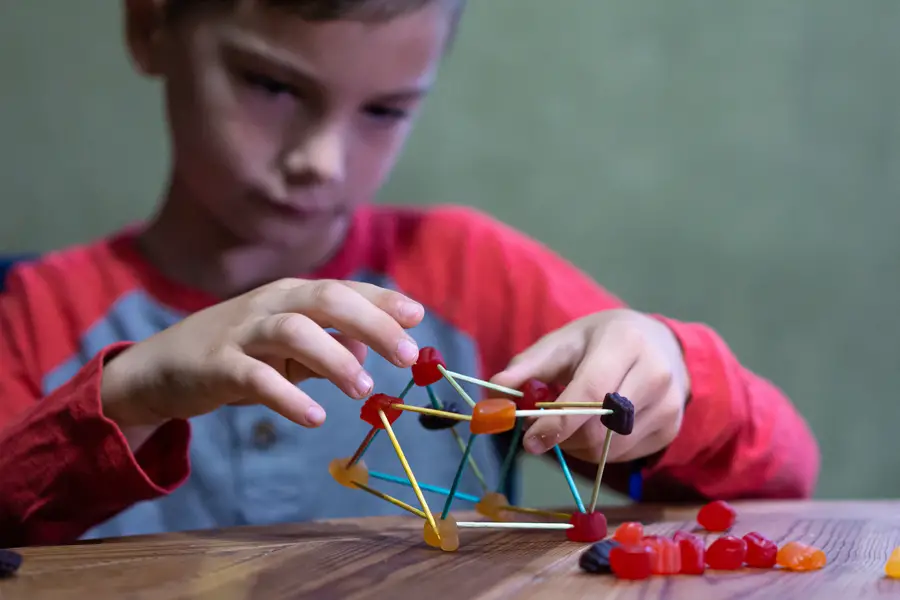
Candy Chemistry
It’s also possible to create cell molecules by using marshmallows, gumdrops, and skewer sticks. You can combine gumdrops and marshmallows; you can create a simple 3D representation of cell molecules to help students grasp basic chemistry concepts.
We used some fruit snacks:
Here are some science experiments using food items to make chemical reactions:
Vinegar and Baking Soda
A Collection of kitchen STEM projects wouldn’t be complete without vinegar and baking soda. A common staple found in most kitchens, these two items make a chemical reaction found in many classic science experiments.
Vinegar is a weak acid, and baking soda is a base. If you mix them together, you’ll get a bubbly chemical reaction. Combining the two together causes an exothermic reaction that produces carbon dioxide. The carbon dioxide is what causes the sudden foamy expansion.
We did a quick experiment to see if the carbon dioxide gas given off was enough to inflate a balloon:
If you simply mix vinegar and baking soda together, you can see the reaction (add a bit of red food coloring for the classic volcano eruption.)
If you want to learn more about what makes it fizz, check out our post on the chemical reaction with vinegar and baking soda. (and of course you’ll find more activities with vinegar and baking soda!)
Naked Eggs
Have you ever wondered what an egg looked like without the shell? Not just cracking it open to cook up some eggs, but what if you could dissolve the shell and leave the insides intact? This is easy to do by just soaking the egg in vinegar. You can see this experiment and more over on our post STEM Activities with common household items.
Homemade Butter
We found out it was surprisingly easy to make our own butter, and it’s another simple chemical reaction. Just agitate heavy cream to separate the fats and liquids. You can try it yourself, or follow along with us in this post about what makes a great STEM activity.
Homemade Ice Cream
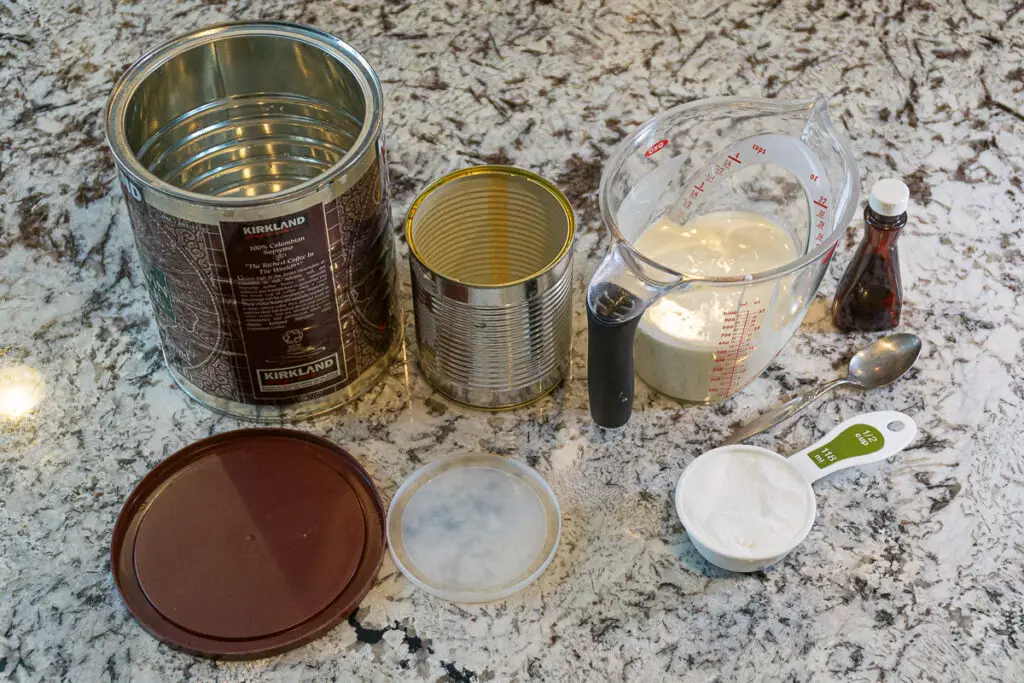
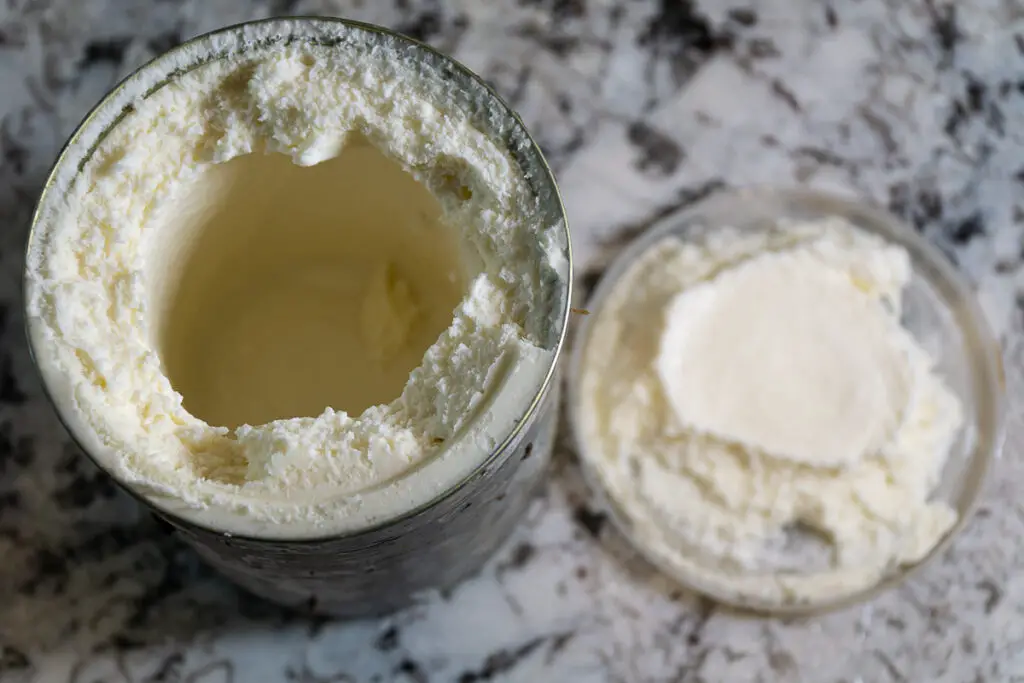
You can make your own ice cream at home with a few simple ingredients. It’s fresh, tastes great, and doesn’t have all the chemicals and preservatives.
Check out the full post and recipe in our post on STEM projects with tin cans.
Plastic Milk
Here’s a bit more kitchen science. I may never look at milk the same way again, but the kids are still asking for milk even after seeing it turn into plastic.
You just need milk, vinegar, a strainer, and a bowl. For every cup of milk, use 4 tablespoons of vinegar.
This experiment, often known as the “Milk Plastic” or “Casein Plastic” experiment, involves heating milk and adding an acid, like vinegar, to it. The acid causes the milk to separate into curds and whey. The curds, which are composed of a protein called casein, clump together and can be molded into shapes. As they dry, they harden into a plastic-like material.
- Heat the milk in a saucepan or microwave – you want it hot but not boiling
- Add the vinegar and stir. The milk will get chunky as the acid in the vinegar reacts to the proteins in the milk.
- Once the proteins in the milk break down and the clumping stops, pour the mixture through the strainer to separate the liquid from the chunks.
- Squeeze out as much fluid as you can
What’s left in the strainer will harden into plastic. You can shape it or press it into a mold or cookie cutter and let it harden. It may take a day or two before it fully dries out.
This activity not only shows the chemical process of denaturation and coagulation of proteins but also provides a glimpse into the history of plastics. Casein plastic was actually used in the early 20th century for making various items like buttons and jewelry.
It’s a great way to teach children about the properties of different materials, the versatility of natural substances, and the basics of polymer science. It’;’s a hands-on way to create something unique and biodegradable using just a few simple kitchen ingredients.
Related Post: For more no-bake food activities, check out our post on Science Experiments with Apples
Now we’ll get into some baking:
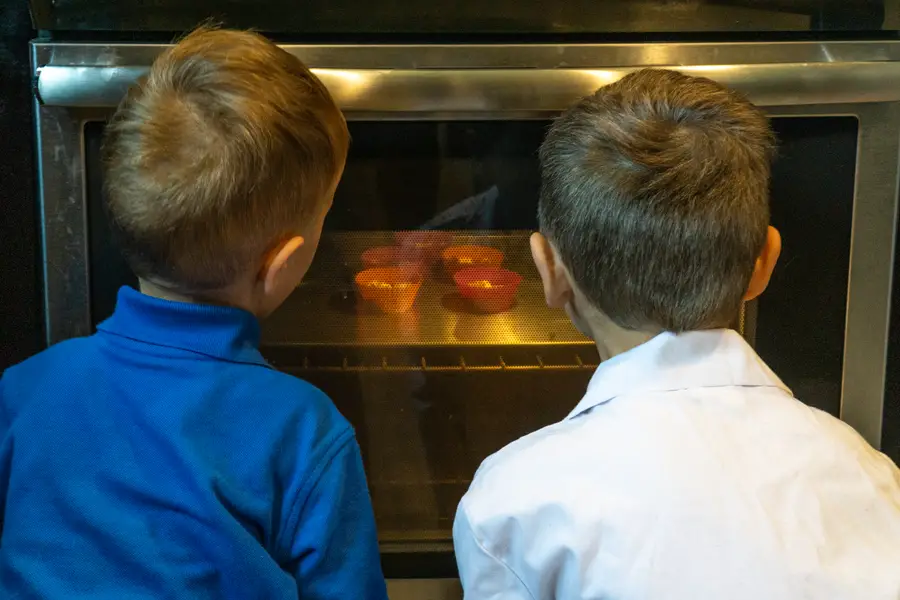
Make Igneous Rocks you can eat
This one is fun and tasty. The heat of a volcano is so intense, rocks melt to form magma and cool to form Igneous rocks. Igneous rocks are formed when magma crystallizes and cools.
Intrusive igneous rock takes a long time to cool within the Earth’s crust (as opposed to extrusive, which cools outside) and as a result of the slow cooling typically has larger hunks within the rock texture, which is the look we’re simulating in this activity.
We can make our own igneous rocks in the oven. A quick look at the ingredients and you’ll see we’re basically making s’mores – but these s’mores look like a rock formation.

You’ll need:
- Cupcake trays
- Chocolate chips (or M&Ms – we used both!)
- Mini Marshmallows (or you can cut up large marshmallows)
- Graham Crackers, broken into smaller chunks
Once you’ve gathered everything you need:
- Place the ingredients in a cupcake tray. Aim for equal amounts of each ingredient.
- Place in the oven and heat until melted. About 12 minutes at 350 degrees F worked well for us.
- Remove from the oven and let them cool
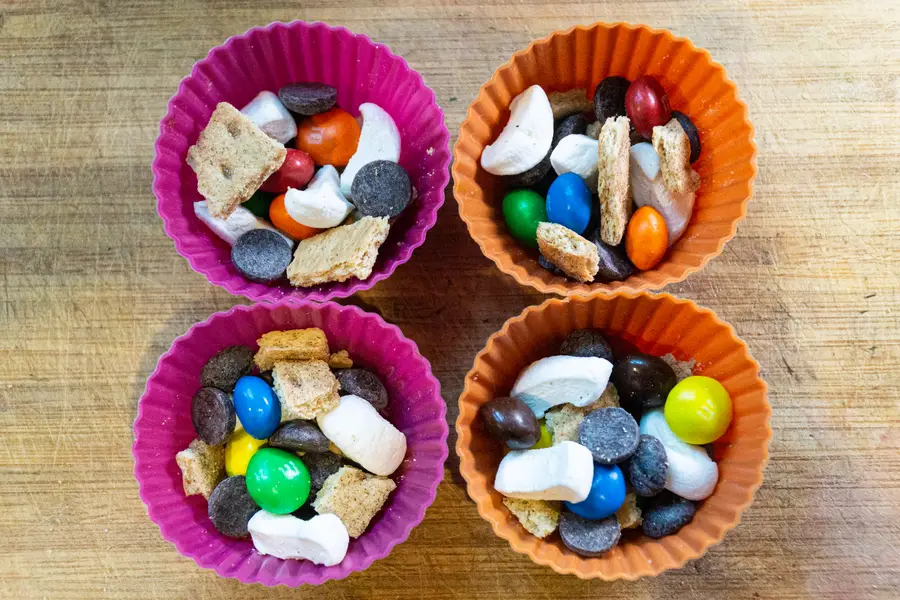
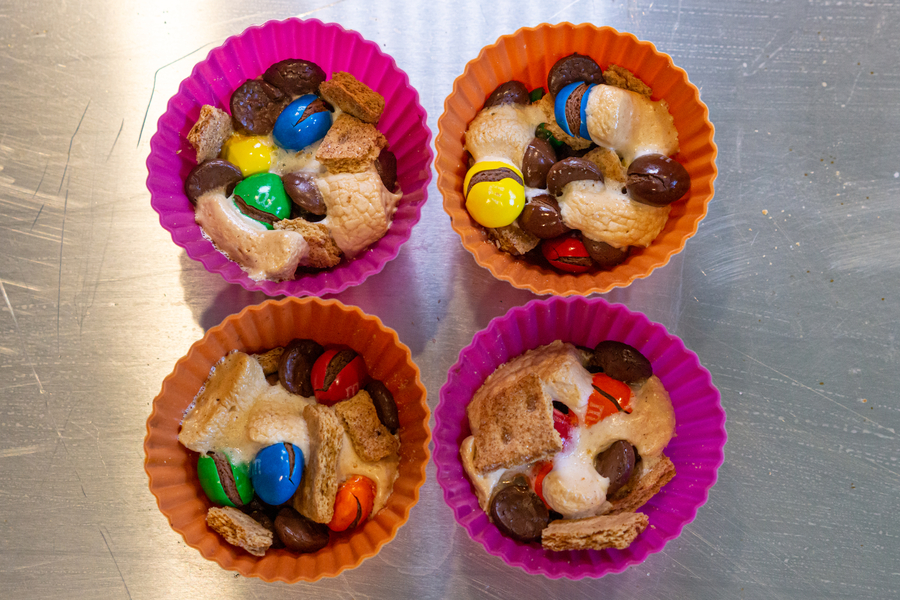
Encourage your kid(s) to experiment with other materials; Rice Krispies, Peanut Butter Cups, Peanut M&Ms, crunched up Oreos can all work well. You could also try substituting Peeps for the marshmallows.
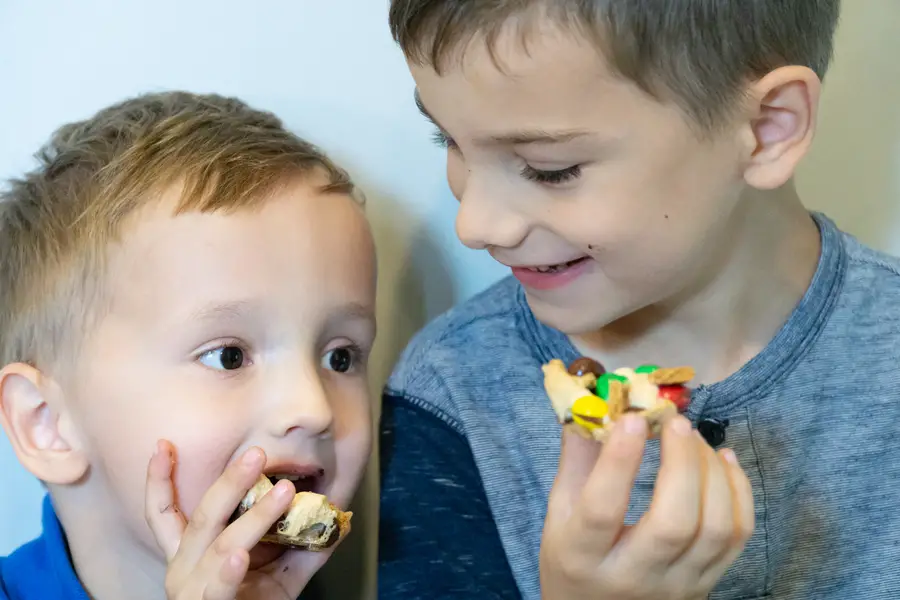
Observe which ingredients melt first, and how each is affected by the heat. In our example, you can see that the marshmallows browned, the M&Ms cracked open, and chocolate melted.
Edible Glass Candy
Another cool experiment that you can carry out in the kitchen is to make edible glass out of sugar. This can be made with:
- 2 Cups Granulated Sugar
- 3/4 Cup Light Corn Syrup
- 3/4 Cup Water
- Sauce pan
- Baking tray of cookie sheet
- Wax baking paper (or cooking spray)
- cooking thermometer
- Food Coloring or flavored extracts (optional)
It’s incredibly easy to do:
- Line a baking tray with the baking paper
- Add the sugar, syrup, and waterto a saucepan
- Bring to boil and stir regularly
- As the water boils off, the temperature will rise.
- Keep stirring
- Once the mixture reaches about 300ºF (about 150ºC) you’re ready. This may take around 40 minutes, so be patient.
- If you want to add food coloring or flavored oils, you can stir it in quickly as you remove it from the heat. Our kids love a bit of blue coloring and peppermint extract.
- Pour the mixture into the baking tray, (do not touch, this stuff is HOT!)
- Let it cool down for an hour or two until it’s fully solid
The final product will be a piece of edible glass. You can show the kids how it shatters (lifting the tray a few inches off the counter and dropping it should shatter the candy sheet.)
Making glass candy is a great opportunity to discuss some science concepts like how the sugar dissolves in the water to form a solution. You can discuss how temperature affects different states of matter as the water boils off into steam and the molten liquid mixture cools into a solid.
Now have fun with it. Need some frozen Elsa ice? Stained glass? A bloody shard for a Halloween cake? Candy glass is perfect!
You can also make Rock Candy, which you can see in our post on STEM activities with household items.
Layer Cakes
For a more geography-focused exercise, you can make a layered cake, which you can cut to demonstrate the multiple layers of the earth, i.e. the core, mantle, crust, etc. just like the pudding example above.
Use your favorite sheet cake recipe and make some cake to use. Brownies can also work well for some variety.
Stack layers of the cakes. You can use icing in between; it not only adds another “layer,” but glues everything together.
Snack Stack
You can achieve a similar effect by layering a stack of your favorite snacks. Try brownies, rice krispy treats, chocolate chips, etc, to stack and bake into a super snack stack!
More Cooking and Food Science
If you like cooking and are interested to know WHY certain ingredients complement each other, you’ll want to check out Alton Brown. He had a wonderful series with Good Eats. He explains not only how to cook some pretty delicious dishes, but also why certain techniques or combinations work from a science perspective. Food and science pair well together. You can watch full episodes of Good Eats on Youtube. Pick your favorite recipe and follow along at home.
Add some STEAM
Steam is often used for cooking, though set aside your steamers for the moment. In this case, we’re talking about Art and STEM, for STEAM.
The amount of science behind combining ingredients is often secondary to the actual art of cooking itself. Turn on any cooking show and you’ll see chefs striving not only for the quality of the food itself but the presentation. How does it look on the plate? The design of the dish and arrangement on the plate is an art form, and in some cases can make or break a dish.
Wrap Up – Is Cooking A STEM activity? STEM in the kitchen.
For anyone that wants to put together a fun activity to help your kids develop their knowledge of STEM theory and its practical applications. For parents, this is also a fantastic way to create a connection with your kids through collaboration (and make some delicious meals or treats together.)
And, if you’re teaching groups of kids, be sure to encourage them to collaborate and divide their labor for maximum efficiency – which is a whole new lesson in itself.
Over time, kids’ knowledge and practical skills will develop, and cooking/kitchen science STEM lessons can get more advanced as time goes on and students start to gain high levels of aptitude.
Check out more edible STEM activities.
Pin it for later or to share:

2 responses to “How To Make Cooking A STEM Activity (In 5 Steps)”
I have read some excellent stuff here Definitely value bookmarking for revisiting I wonder how much effort you put to make the sort of excellent informative website
Great post! Very informative and well-written. Looking forward to more content from this blog!Thank you