
There are exciting things you can do with 3D printers. Having a background in music, I wanted to see what kind of instruments could be made on a 3D printer. There are free models of a variety of instruments available online. It’s amazing what is possible through 3D printing.
While there are simpler options for 3D printed instruments available, I was curious to see how to make a 3D printed violin. In this post, we’ll take you through a 3D violin build. Let’s explore!
*We’re an affiliate – we may earn a commission through qualifying purchases from the links on this page. As always, thanks!*
Choose Your Violin Model
The body size of the violin looked to be the key factor after perusing the available models online. Most acoustic violin bodies were in one piece, and would not fit on our printer. The Hovalin and Modular Fiddle look like they’d be fun to try, though we’d either need a bigger printer or scale the whole model down to fit the print bed. Scaling works for some models, but for something like a violin would lead to issues with parts like tuning pegs, pickups, screws, etc. Scaling down isn’t viable for our application since we wanted to make full size 4/4 violin,.
We found a model which looks like a traditional violin where the body was separated into several pieces to accommodate a wider range of printers. With the hollow pieces, printing with supports looks to be a challenge, and may use as much filament as the piece itself. I’m also curious how PLA would hold up to the tension of the stings with a hollow body, especially along the seams where the body pieces are joined together.
We decided to try an electric violin because they can be a bit more modular, and the pieces are solid. We chose this free model from Thingiverse if you’d like to build along with us or are just curious.
The largest part can easily fit on the bed of our Creality Ender 3 Pro printer, and we can run the electric violin through our effect pedals and processors and see what we can do with the sound for more fun.
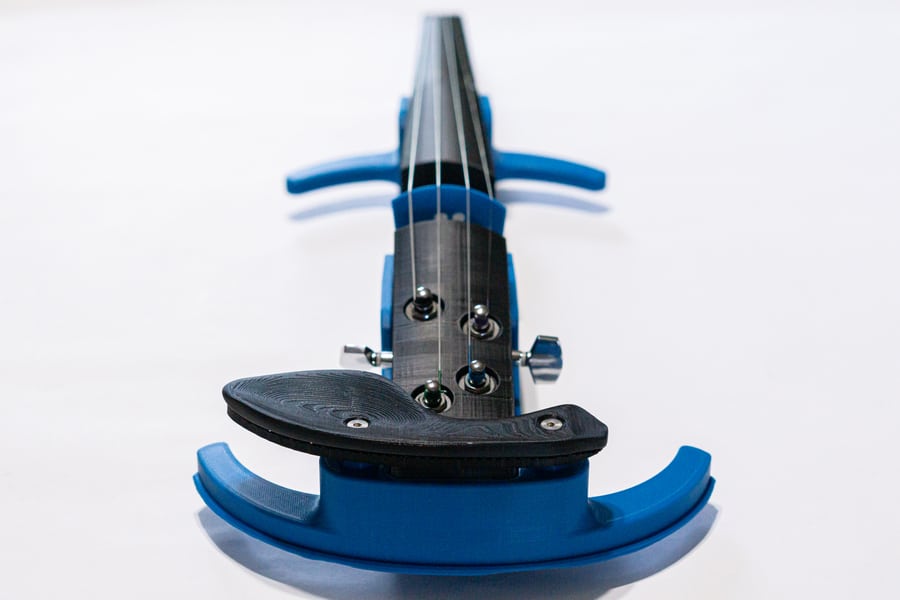
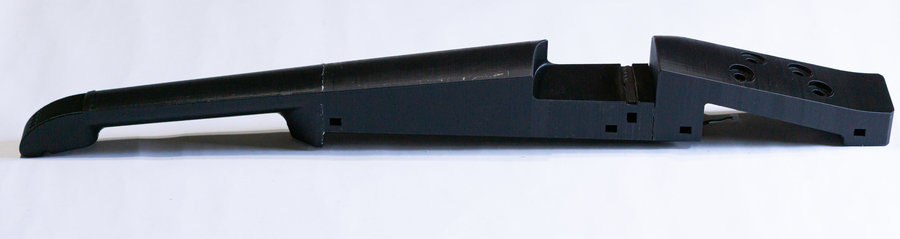
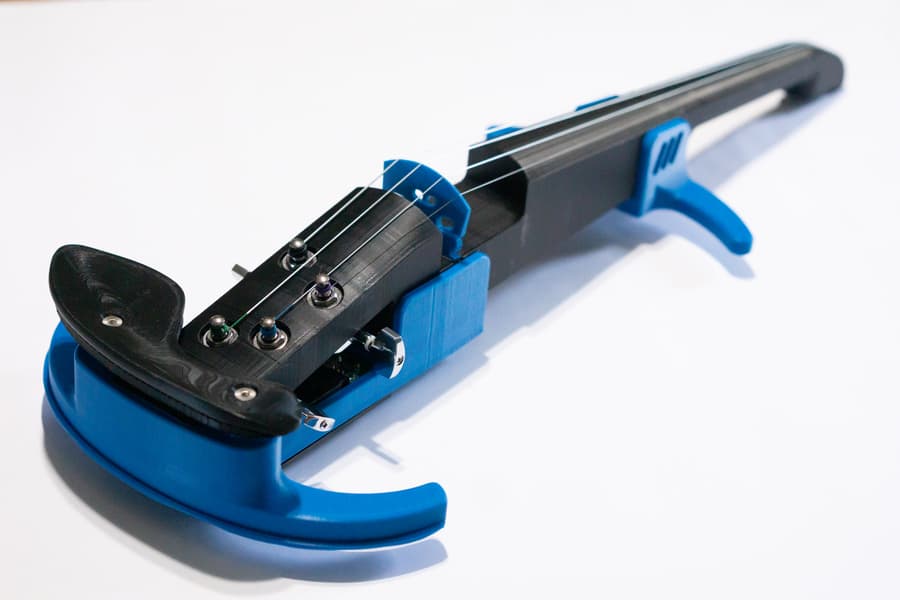
This violin model is in 6 parts: 3 for the neck assembly, two for the body, and a chin rest. We also 3D printed a bridge, though you could use a standard wooden one if you like.
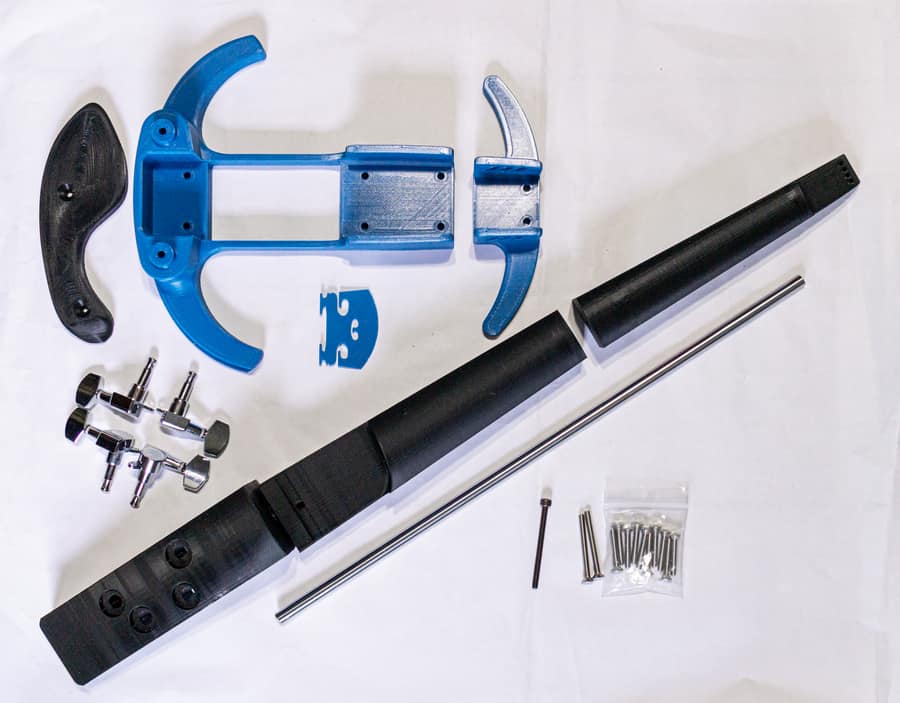
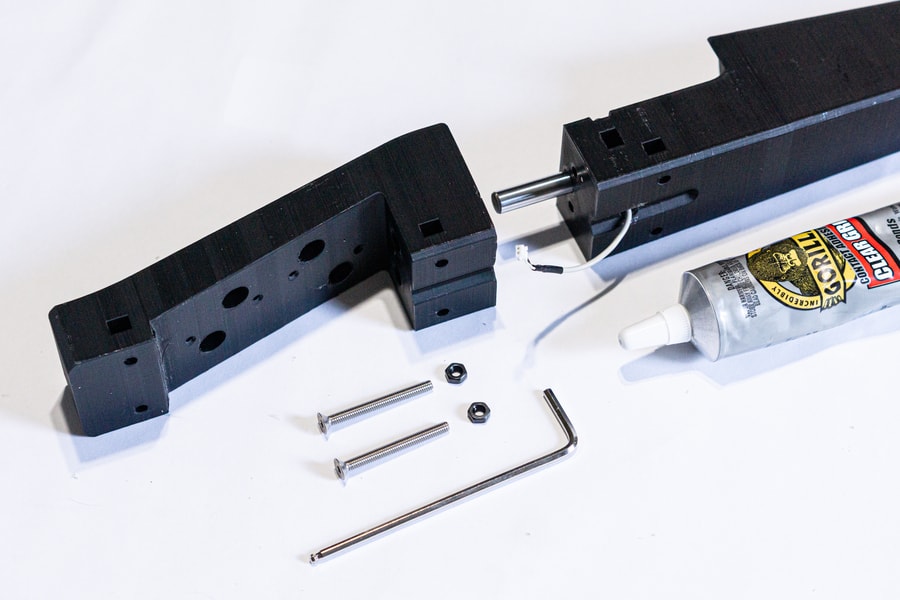
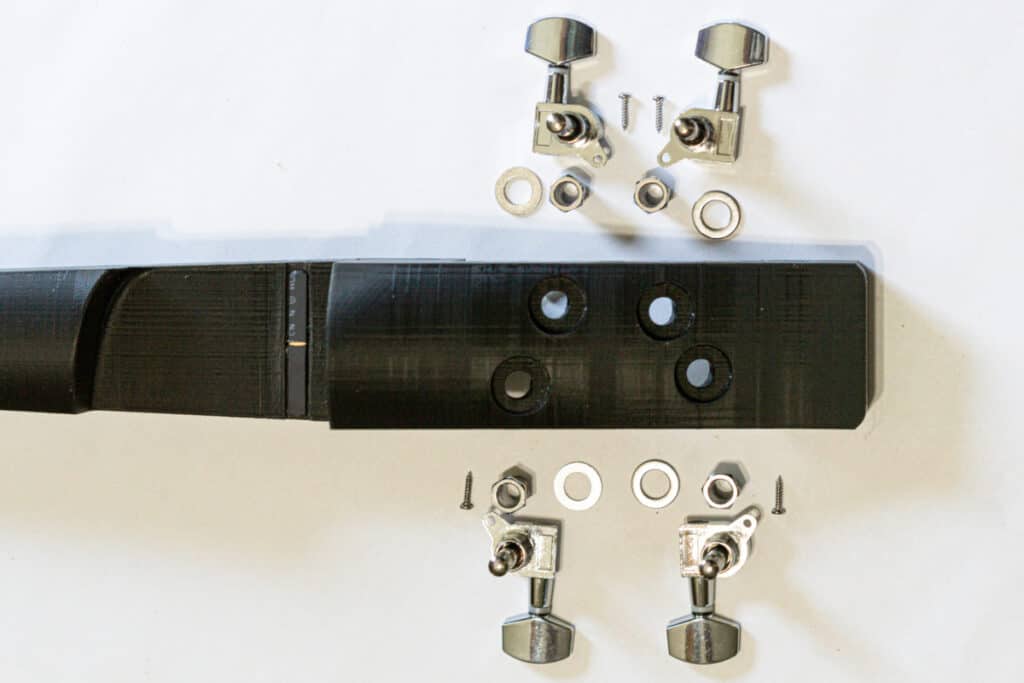
In addition to the printed pieces, we’ll need some screws and glue to hold everything together. A steel rod will keep the neck of the violin straight and allow the violin to hold under the tension of the strings. We’ll use guitar tuners instead of traditional violin pegs, so it’ll be easier to tune (at least for me – I’ve played guitar far longer than I’ve dabbled with violin.) This is an electric violin, so we’ll need a pickup and preamp (the electronic guts) if we want to play at volume.


Here is the parts list, with links to source the parts online:
- electronic preamp & pickup
- 9V Battery
- guitar tuning pegs – 4 pieces (usually sold in sets of 6 for guitars)
- metal rod M8x370 – 37 CM
- screws:
- m4x25 – 9 pieces
- m4x50 – 1 piece
- m4x40 – 2 pieces
- m3x8 – 4 pieces
- m2x10 – 4 pieces
- nuts:
- m4 – 12 pieces
- m3 long nut – 4 pieces for hot installation in holes (for pegs screws)
Prep the 3D Model
Once you get your STL file(s), you’ll need to prepare them for the printer with a “slicer” program. The STL is the file of the 3D object. The slicer will generate a “gcode” file that provides your 3D printer with instructions on how to build the piece, layer by layer.
There are a number of free slicer programs available. We use Cura, which is freely available.
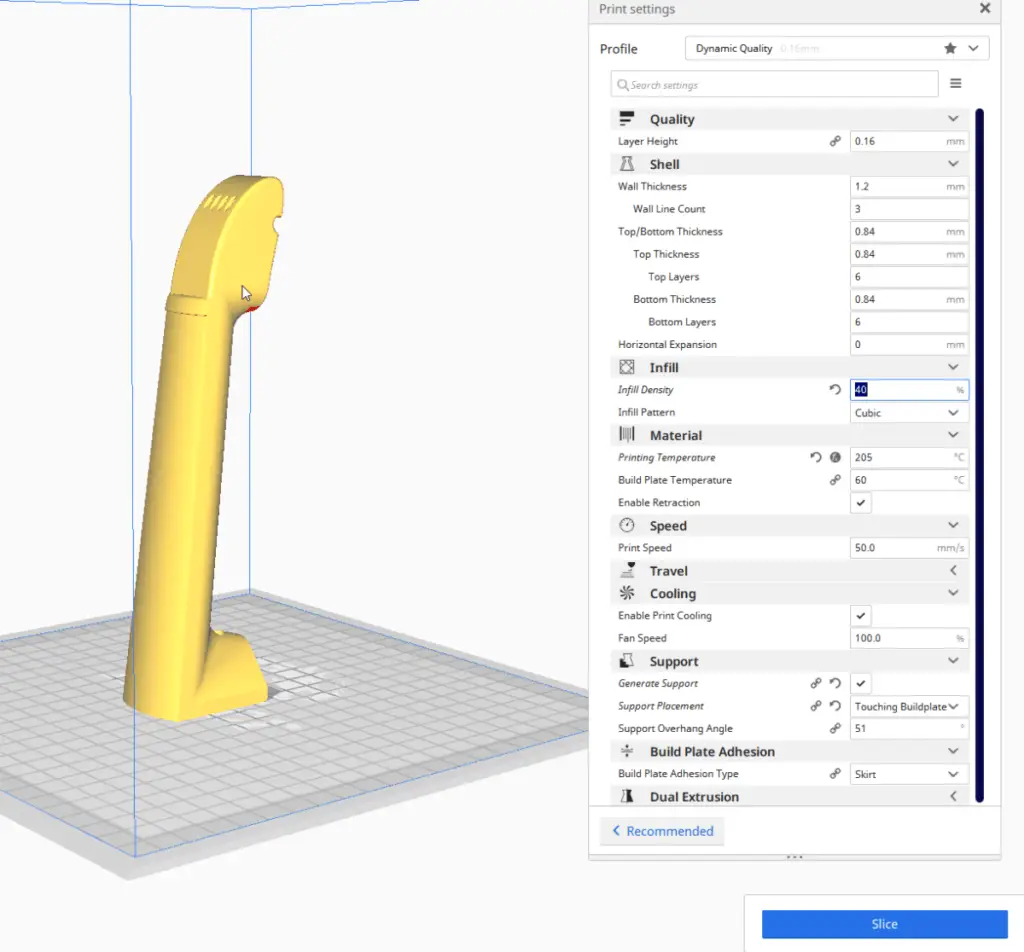
Once you have all of your STL files prepped and converted to gcode, you’re ready to print your parts. Print time of individual pieces will vary depending on your slicer settings. Plan for a few days for all of the parts to print.
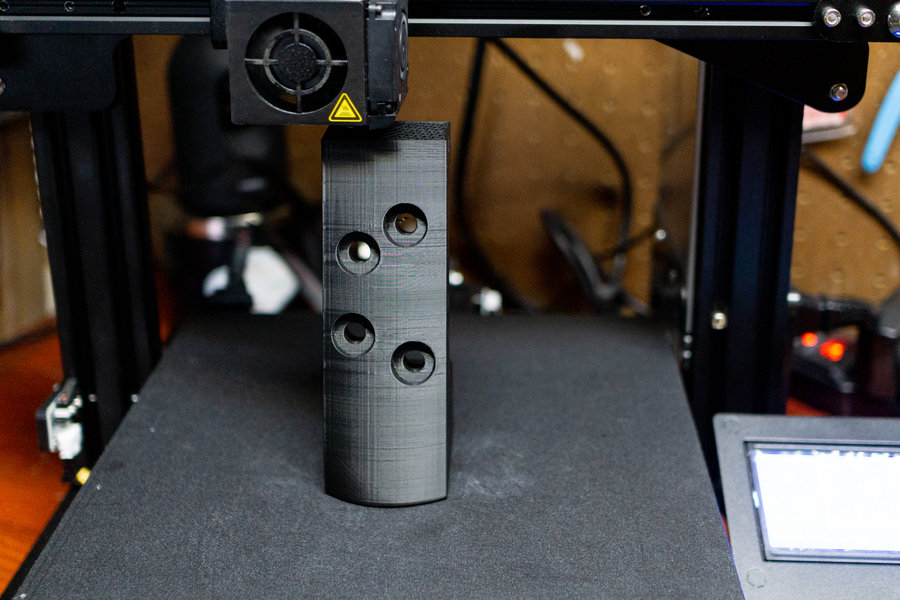
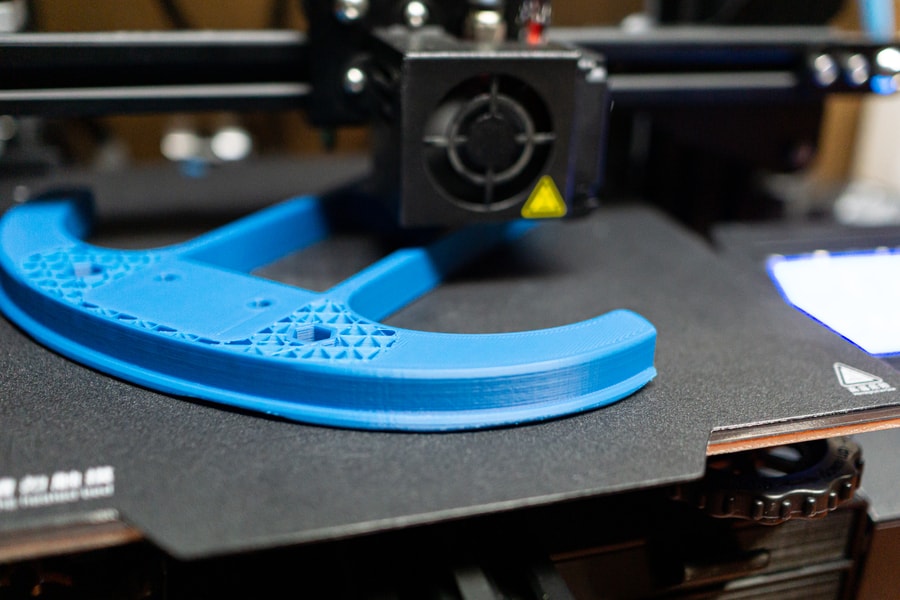
Print Your Violin Parts
Select a color scheme. You can print with any filament you have on hand, or you can do something a bit more purposeful.
We chose black for the 3 neck pieces.
We printed the body pieces in blue, which offset nicely against the black.
We chose to print our own bridge piece and used the same blue as the body. (If you’ve got a spool of filament, with only a bit left at the end, print a few bridge pieces. They don’t use much filament, and it’s a great use of the end of a spool.)
Assembling Your 3D Printed Violin
Putting the neck together
One of the hardest parts of this whole build was getting the metal rod through the holes and positioned correctly. We managed to get it stuck and had to place the rod in a vice and wrestle with it to get it back out. We finally got it to work by heating the rod in boiling water for a few minutes, and gently tapping it through the main bridge piece with a hammer.
Once we got the rod all the way through, it was a matter of positioning it to fit the top piece with the headstock and the bottom piece with the tuners. We had to do a little dremel work on the bottom piece to get a flush fit. Here’s a link to the tool we used. It has several speeds, is rechargeable via USB, and is not overpowered as to melt or tear through the PLA plastic. It’s delicate work and you’ll need to drill a bit, and check the fit of the rod. The rod sits close to the edge of the piece, so be careful not to drill right through the bottom.
A threaded rod would have been easier, as it could of screwed into the plastic. We had a difficult time sourcing a threaded rod of the correct length, though if we do another build may just cut a threaded rod to size.
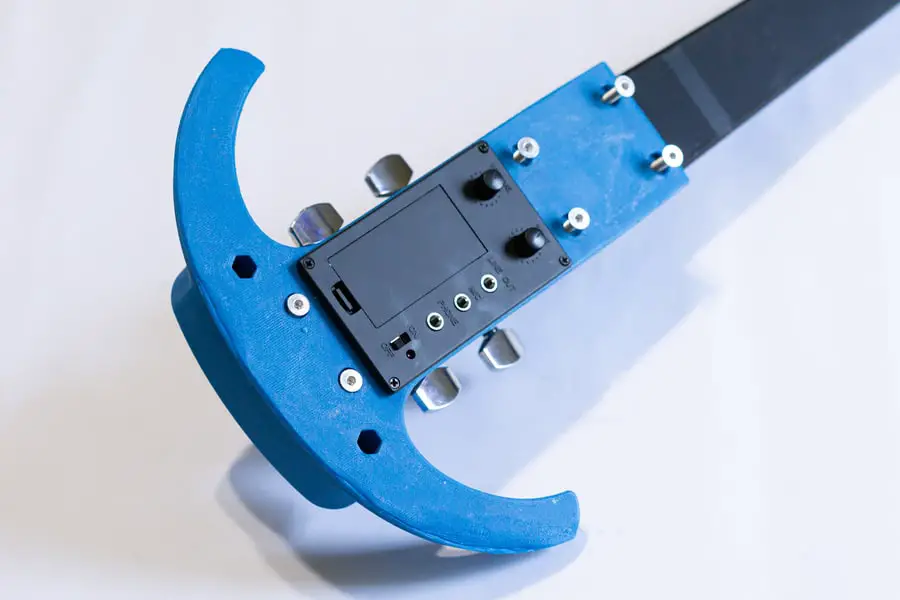
Installing the Pickup and Electronics
Next came installing the pickup. It’s designed to fit into a groove where the bridge goes, with the wire dropping down a hole straight through the neck where it would perfectly plug into the pickup. That’s great, except for the metal rod that occupies 100% of the hole and leave no room for the wire.
Time to get creative. We had to use a small rotary tool to widen the hole a bit and bore out a cavity where the wire could loop around the metal rod. What’s the worst that could happen? It gets completely screwed up and we have to print the piece again.
There’s not an exact science to it. We had to hollow out a bit, see if the cable would fit and allow the rod to pass, and hollow out a bit more until we had a decent fit.
I’m wondering if a threaded rod would have made this easier, but don’t see where it would have allowed enough room to fit the wire and connector through. There’s still going to be the need to drill a bit of a cavity to fish the wire around the rod.
Note: There are a few different styles of these pickups. Some involve soldering the pickup wired to the board, and others clip into the board. The battery compartments also vary. We chose a pickup that had a flush battery compartment. Most of these will ship from overseas and have a long lead time (6-8 weeks) for delivery.
Gluing and Screwing the Neck
The rest of the build was mostly gluing and screwing the pieces together after clearing the pickup placement hurdle. We assembled the 3 neck pieces first. Once you’re happy with the fit of the 3 main pieces and the rod, it’s time to secure them. Apply a bit of glue, position the piece, and screw it together.
There are side grooves for the nuts to fit. Use the M4x50 and M4x40 screws to secure the top headstock piece to the main neck piece. The bottom piece is secured by the M4x25 screws.

Note – we found the holes for the M4x25 screws were a bit shallow and had to use the dremel tool to make the holes a bit deeper. Make sure you check the fit and adjust before starting to glue everything together!
Attach the tuning pegs to the neck piece.
Attach the Body Pieces
Secure the pickup electronics to the “body” piece with 4 of the tiny screws it came with. Plug the pickup wire into the board and screw the body to the neck. You may find it easier to snap in the pickup wire before attaching the neck piece to the body (or if you’ve picked up a preamp that requires soldering, this will be much easier now before everything is assembled.)
Attach the main body piece to the neck piece. There are six screws that hold these two pieces together. We didn’t use any glue on the body pieces, which gives us the option to swap there out later if we decide the experiment with different colors.
Attach the top “body” piece. There is a groove for a nut on either side of the neck. You’ll want to make sure the nuts are in place before sliding the body piece on. Two screws hold this in place from underneath.
Screw in the chin rest.
Strings and Bridge
The bridge is designed to be positioned on top of the piezzo pickup. The tension of the strings will hold it in place.
String it up and tune it up.
Play your violin!
Building your own violin from primarily printed parts is cool, but how does it sound? Is it worth the effort?
How does it play? I wasn’t quite sure what to expect from a 3D printed violin. I went in with an open mind and low expectations. I figured if it was a total fail I’d at least learn something completing the build. That said, I was pretty impressed. The violin feels solid, and stays in tune. Frankly, it plays as good a my “traditional” acoustic violin. I can feel the seem between the 2 neck pieces that join the fingerboard, but it doesn’t affect the sound (I’m not playing that high on the neck terribly often.)
How does it sound? I’m far from a violin virtuoso, though it plays fairly easily and sounds good. Unplugged, it’s not incredibly loud, but is loud enough for practice and has a nice tone. With the pickup, it’s largely going to depend on what you’re using for an amplifier. Amps will color the sound, and you can use EQ to balance or sculpt the sound and tone.
Bottom line -I’d be comfortable playing on stage with this if I was still performing. It’s sturdy enough to travel. It’s easy to replace if something happens to it. Just print replacement parts, or a whole new violin!
Related Posts: Don’t miss our 3D printed guitar and other 3D Printed Instruments
Wrap Up – How to Make a 3D Printed Violin
Outside of a few minor difficulties, this was a fun build.
The most challenging part was working through the issue with running the pickup wire through the hole that was occupied by the metal rod. We’re not the only ones who hit this problem. The comments on Thingiverse have a handful of folks asking about the issue – with no clear answer provided.
For more 3d Printing projects and gear, check out our post here. If you want to get kids involved in printing, check out our post on 3D Printing for Kids.

-
How to Make a 3D Printed Violin
There are exciting things you can do with 3D printers. Having a background in music, I wanted to see what kind of instruments could be made on a 3D printer.
-
3D Printing for Elementary Students: 3D Printing for Beginners

We love our 3D printer, and it’s a great tool for introducing the kids to a bit of technology while doing something fun together. There are a number of engaging
-
3D Printed Halloween Ideas: Spooky DIY Masks and Decorations

With a 3D printer and a bit of creativity, you can custom make your own unique costume, accessories, and decorations. Whether you’re looking for something cute or terrifying, here are our favorite ideas for 3D printed Halloween costumes, props, and decorations.

