
Transforming your kitchen into a chemistry lab is a fantastic way to engage kids with science in a fun, hands-on way. Here are several science activities that use simple ingredients found in most kitchens to explore basic chemistry concepts. Let’s explore!
Baking Soda and Vinegar Volcano
Concepts Explored: Acid-base reactions, gas production
Activity: Mix vinegar with a few drops of food coloring and dish soap in a bottle. Add baking soda and watch your volcano erupt with colorful lava.
Materials Needed:
- Baking soda
- Vinegar
- Dish soap
- Food coloring (optional)
- A small container or bottle
- A tray or dish to catch the overflow
Instructions:
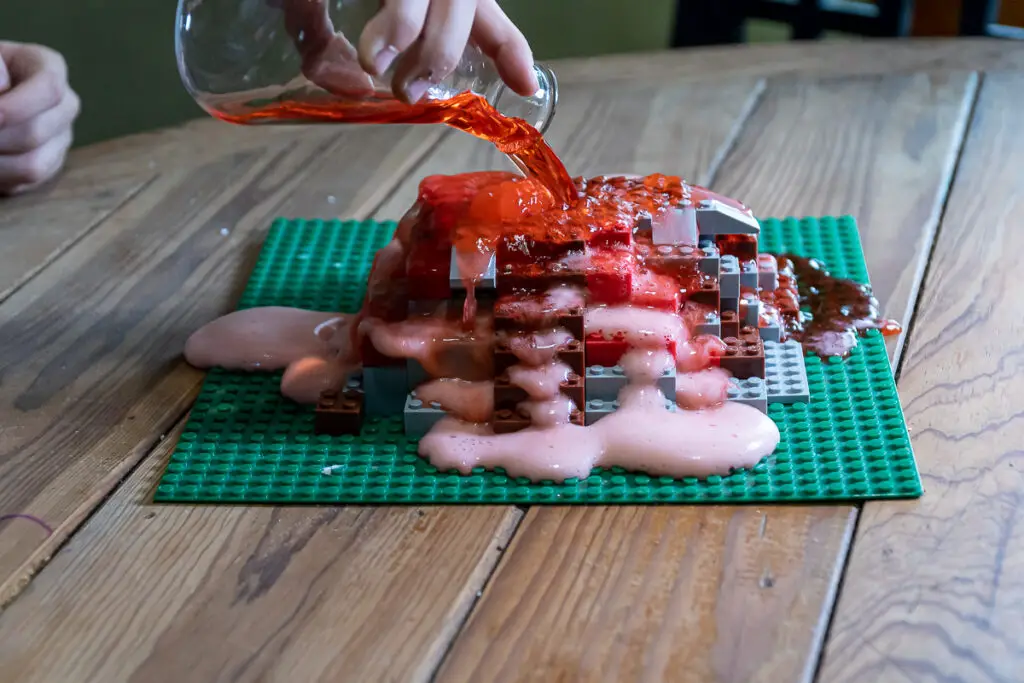
- Prepare the Volcano Structure: Place the container or bottle on the tray. This will be the “volcano.” If you want to make it more realistic, you can shape clay or dirt around the container to form a volcano shape, leaving the opening at the top accessible. We built a volcano with LEGO bricks.
- Mix the Lava: In the container, mix a few tablespoons of baking soda, a squirt of dish soap, and a few drops of food coloring (we used red.) The dish soap will help create more foam, and the food coloring will make it look like lava.
- Erupt the Volcano: Pour vinegar into the container with the baking soda mixture and watch as the chemical reaction between the vinegar (acid) and baking soda (base) creates carbon dioxide gas, which bubbles up and causes the colorful “lava” to erupt out of the volcano.
- Discuss the Reaction: Talk about the science behind the reaction, focusing on acid-base reactions and gas production. Discuss why the mixture foamed and overflowed.
Milk Art Experiment
Concepts Explored: Surface tension, chemical reaction
Activity: Pour milk into the dish, add drops of food coloring, and touch the color with a cotton swab dipped in dish soap. Watch the colors explode and swirl.
Materials Needed:
- Full-fat milk (the fat content is important for the reaction)
- Food coloring
- Dish soap
- Cotton swabs
- A shallow dish or pan
Instructions:
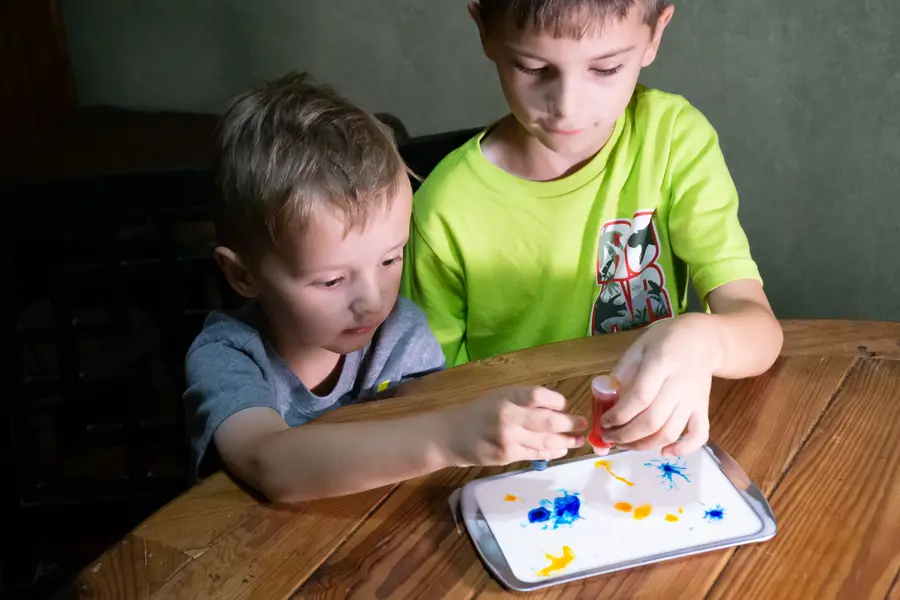
- Prepare the Milk Canvas: Pour enough milk into the shallow dish to cover the bottom. Allow the milk to settle and reach room temperature for a more dramatic effect.
- Add Color: Carefully add drops of different food coloring to the milk. Place the drops near the center of the dish for a more concentrated effect, but don’t let them touch each other directly.
- Introduce the Soap: Dip the tip of a cotton swab into dish soap, ensuring you get a small amount on the end. Then, gently touch the soaped swab to the surface of the milk, near one of the food coloring drops.
- Observe the Reaction: Watch as the food coloring swiftly spreads away from the soap, creating beautiful, swirling patterns. The soap reduces the surface tension of the milk, causing the fat and water molecules to move away from the soap, and carrying the food coloring along for the ride.
- Experiment Further: Try touching different parts of the milk’s surface with the soaped cotton swab or adding more food coloring to see how the patterns change. Discuss the science of surface tension and how detergents interact with fats and water.
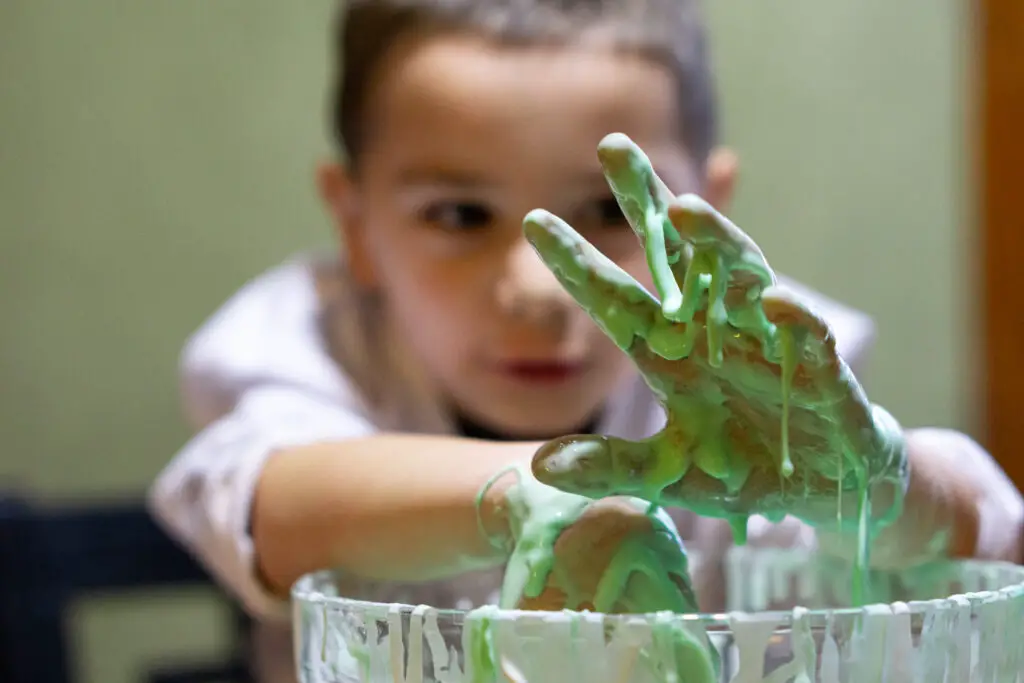
Homemade Slime
Concepts Explored: Polymers, viscosity
Activity: Mix glue and water in one bowl, dissolve borax in another, then combine and knead until it reaches slime consistency. Add food coloring for fun.
Materials Needed:
- White glue (PVA glue)
- Borax (sodium tetraborate)
- Water
- Food coloring (optional)
- A bowl and spoon for mixing
Instructions:
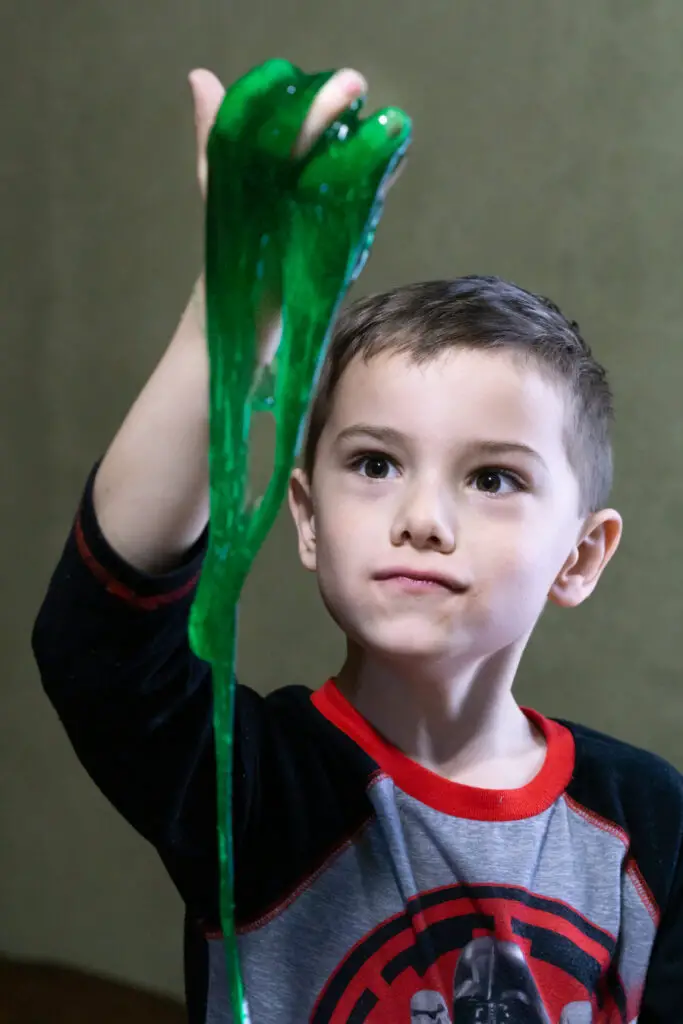
- Prepare the Slime Solution: In a bowl, mix 1/2 cup of white glue with 1/2 cup of water. If you want colored slime, add a few drops of food coloring to this mixture.
- Mix the Borax Solution: In a separate container, dissolve 1 teaspoon of borax powder into 1 cup of warm water. Stir until the borax is completely dissolved.
- Combine the Solutions: Slowly add the borax solution to the glue mixture, stirring continuously. You’ll notice the mixture becoming thicker and starting to form slime.
- Knead the Slime: Once the mixture becomes too difficult to stir with a spoon, use your hands to knead it. Continue kneading until you achieve a consistent, slimy texture. If the slime is too sticky, you can add a little more borax solution.
- Play and Store: Enjoy playing with the slime! When not in use, store it in an airtight container to keep it from drying out.
Oobleck: A Non-Newtonian Fluid
Concepts Explored: Non-Newtonian fluids, states of matter
Activity: Mix cornstarch and water to create oobleck. Explore its properties by punching it (solid-like behavior) and slowly letting it drip through fingers (liquid-like behavior).
Materials Needed:
- Cornstarch
- Water
- Food coloring (optional)
- A large bowl
Instructions:
- Mix the Oobleck:
- In a large bowl, mix about 1 part water to 1.5–2 parts cornstarch. Start with the water in the bowl and gradually add the cornstarch, stirring as you go. If you want to color your oobleck, add a few drops of food coloring to the water before you add the cornstarch. We used a few drops of green.
- Continue mixing until the mixture has the consistency of honey. You might need to adjust the amounts slightly to get the right texture.
- Explore Its Properties:
- Play with the oobleck to explore its unique properties. Notice how it acts like a solid when you apply pressure (e.g., squeezing or tapping it) and flows like a liquid when you let it sit or gently pour it.
- Discuss the Science:
- Talk about how oobleck is a non-Newtonian fluid, meaning it doesn’t follow Newton’s law of viscosity (constant viscosity regardless of stress applied). Discuss how pressure (or stress) changes its properties, making it act differently than normal liquids or solids.
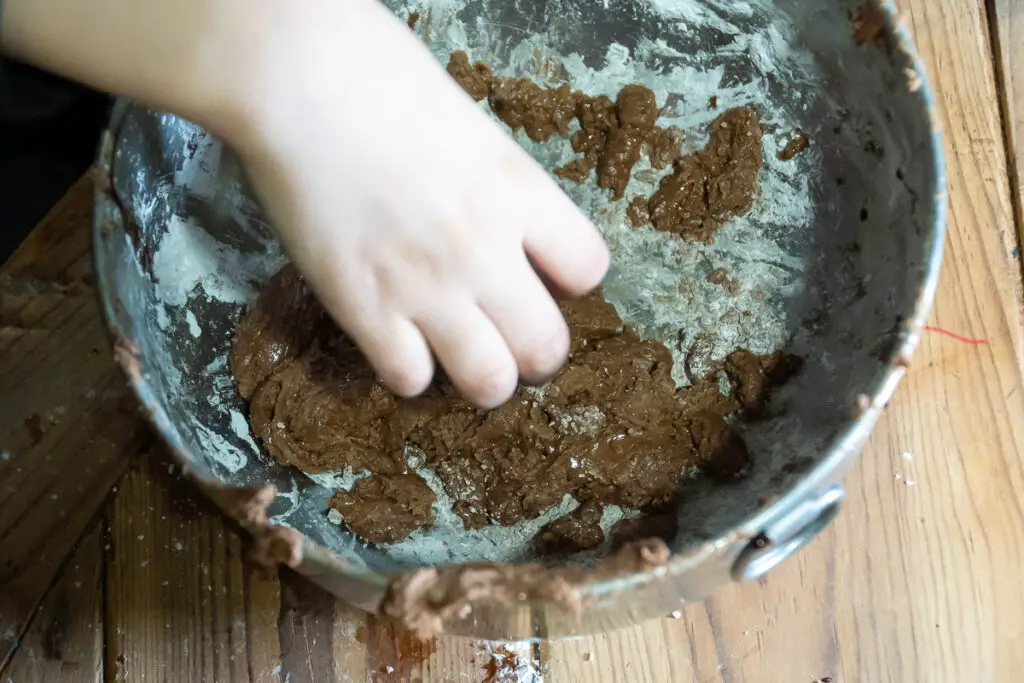
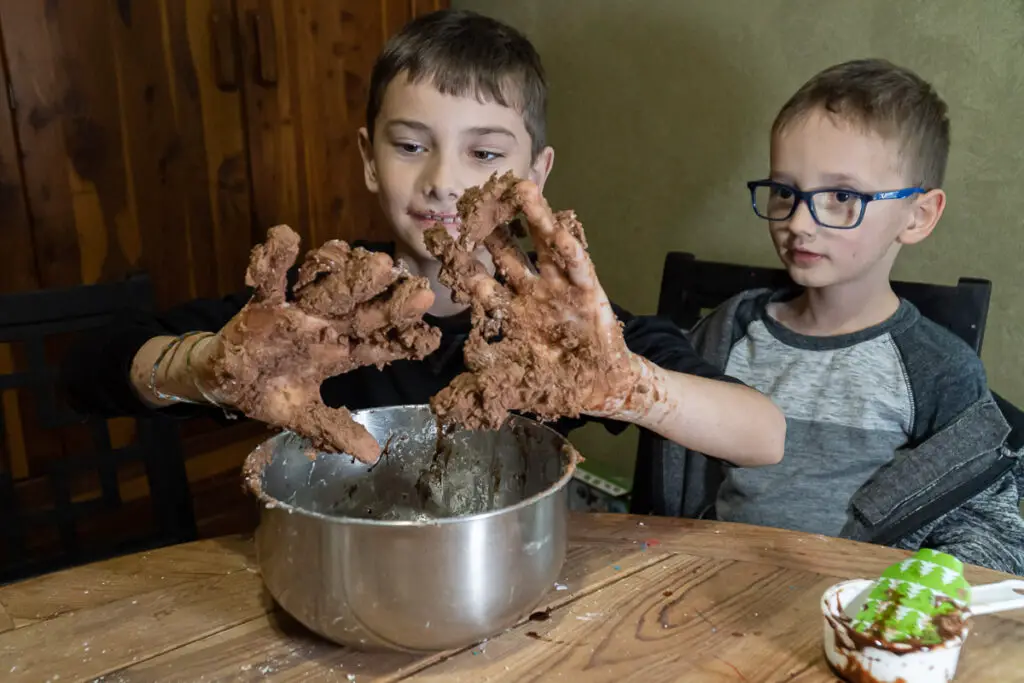
Edible Chocolate Slime
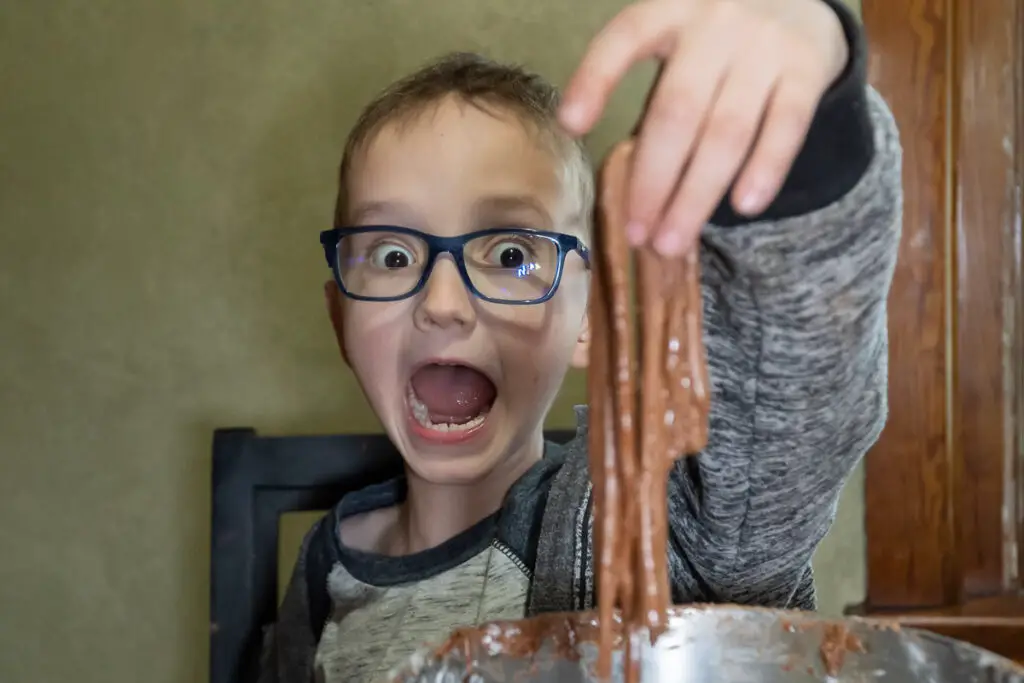
Concepts Explored: Polymers, viscosity
Materials Needed:
- Cornstarch
- Chocolate syrup
- Water
- Mixing bowl
- Spoon


Instructions:
- Gather Materials: Make sure you have all your materials ready. You’ll need cornstarch, chocolate syrup, a mixing bowl, and a spoon. Optionally, you can also have a measuring cup or spoons handy for more precise measurements.
- Mix Cornstarch and Chocolate Syrup: Start by adding about 1 cup of cornstarch to your mixing bowl. Then, pour about 1/2 cup of chocolate syrup over the cornstarch. This ratio doesn’t have to be exact and can be adjusted based on the amount of slime you want to make.
- Begin Mixing: Use your spoon to mix the cornstarch and chocolate syrup together. Initially, it might seem tough to mix, but keep stirring. As you mix, the mixture will start to thicken and take on a slimy texture.
- Adjust the Consistency: After the initial mixing, check the consistency of your slime. If it’s too thick and hard to stir, add a little water (start with a tablespoon at a time). Mix thoroughly after each addition of water until you reach a slimy, yet pliable consistency. If the slime becomes too runny, add a bit more cornstarch to thicken it.
- Test and Play: Once your slime has reached the desired consistency, it’s time to play! Take some slime out of the bowl and let it run through your fingers. Notice how it changes from a solid-like state to a liquid-like state when you let it flow.
- Explore and Discuss: As you play with your slime, think about and discuss the properties you’re observing. How does adding water change the viscosity? What happens to the polymers in the cornstarch when mixed with the chocolate syrup? This is a great time to introduce or explore scientific concepts in a fun, hands-on way.
- Cleanup: When you’re finished playing, you can eat your chocolate slime (since it’s edible!) or store it in an airtight container for later use. To clean up, simply wash your bowl and spoon with warm soapy water.
Invisible Ink
Concepts Explored: Acid-base reactions
Activity: Write a message with lemon juice diluted in water. Let it dry. To reveal the message, heat the paper gently.
Materials Needed:
- Lemon juice (alternatively, you can use milk or vinegar)
- Water
- A bowl or cup for mixing
- Cotton swabs or a paintbrush
- White paper
- A heat source (light bulb, iron, or hairdryer)
Instructions:
- Prepare the Invisible Ink: Squeeze the juice of one lemon into a bowl. Add a few drops of water to dilute the lemon juice slightly. This will be your “ink.”
- Write Your Message: Dip a cotton swab or paintbrush into the lemon juice mixture and use it to write a message or draw on a piece of white paper. Allow the paper to dry completely. The message will be invisible once dry.
- Reveal the Message: To reveal the hidden message, gently heat the paper. You can hold it near a light bulb, use a hairdryer on low heat, or iron the paper on a low setting (with adult supervision). The heat will cause the lemon juice to oxidize and turn brown, making your message visible.
- Discuss the Science: Talk about the chemical reaction that makes the lemon juice change color when heated. This experiment introduces the concept of oxidation and how some substances react to heat.
Density Rainbow
Concepts Explored: Density, solubility
Activity: Create solutions of water and sugar with varying concentrations (more sugar in each successive layer). Add different food coloring to each and carefully layer them in the glass to create a density rainbow.
Materials Needed:
- Granulated sugar
- Water
- Food coloring (different colors)
- A tall, clear glass or jar
- Measuring spoons
- Five small cups or bowls
Instructions:
- Prepare Sugar Solutions: In each of the five cups, mix water with a different amount of sugar to create solutions of varying densities. For example, start with no sugar in the first cup, then increase by adding 2 tablespoons of sugar to the second cup, 4 tablespoons to the third, and so on. Stir each solution until the sugar is completely dissolved.
- Color Each Solution: Add a few drops of different food coloring to each sugar solution. Mix well so each solution has its own distinct color.
- Layer the Solutions: Carefully pour each solution into the tall glass, starting with the one with the most sugar (highest density). Pour slowly and use the back of a spoon or a pipette to gently add the layers on top of each other without mixing them. The order should be from the highest density at the bottom to the lowest density on top.
- Observe the Rainbow: You should see distinct layers forming in the glass, creating a density rainbow. The differences in sugar content create layers of varying densities, preventing them from mixing.
- Discuss the Concept: Talk about density and how it affects the layering of liquids. This experiment is a visual representation of how density works and can lead to discussions about how it applies to real-world phenomena, like oil spills in the ocean.
Crystal Growing
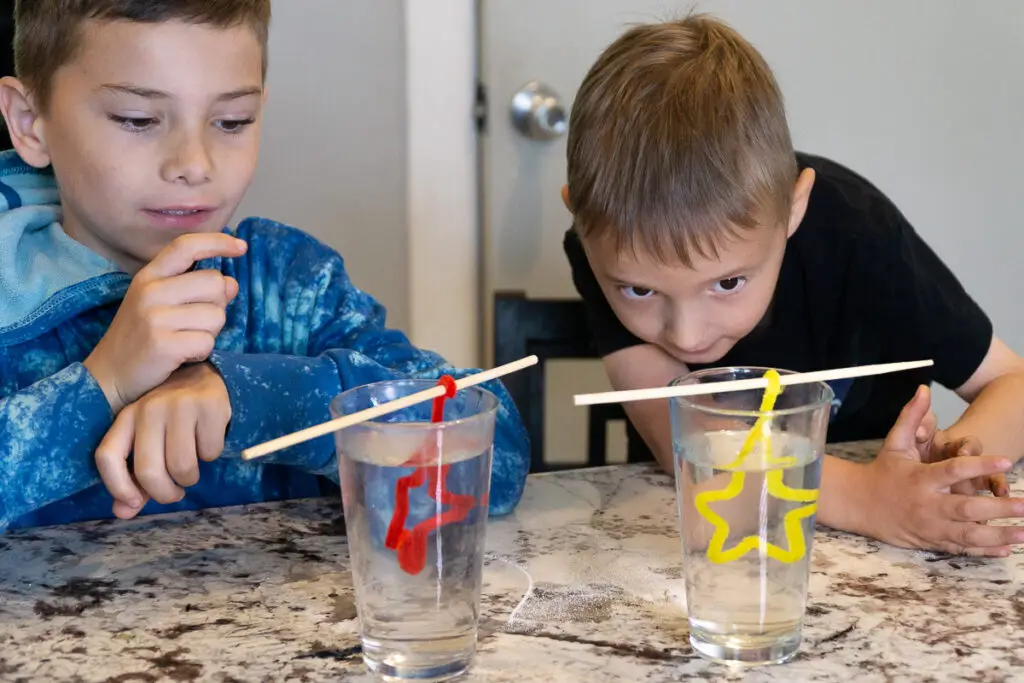
Concepts Explored: Saturation, crystallization
Activity: Dissolve borax or salt in hot water until no more will dissolve. Hang a string or pipe cleaner from a pencil into the solution. Over time, crystals will form along the string.
Materials Needed:
- Borax (sodium tetraborate) or table salt
- Hot water
- A wide-mouth jar
- String or pipe cleaner
- A pencil or stick
- Food coloring (optional)
Instructions:
- Prepare the Solution: In the jar, mix 3 tablespoons of borax or salt for every cup of hot water. Stir until the borax or salt is completely dissolved. If you want colored crystals, add a few drops of food coloring to the solution.
- Prepare the Seed Crystal: Wet a small portion of the string and dip it into borax or salt. Let it dry to form seed crystals. These tiny crystals will give the larger crystals something to grow on.
- Suspend the String or Pipe Cleaner: Tie the string to the middle of the pencil or stick. Make sure the string is short enough that when the pencil is laid across the top of the jar, the string hangs into the solution without touching the bottom. We used pipe cleaners – you can bend them into shape or letters to make some decorations.
- Wait for Crystals to Form: Place the jar in a location where it won’t be disturbed. Over the next few days, crystals will start to form on the string. The longer you leave it, the larger the crystals will grow.
- Discuss the Process: Talk about the process of crystallization and how solutions can become supersaturated. This is a great opportunity to discuss how crystals form in nature and the science behind the shapes and structures they create.
Magic Balloon Experiment
Concepts Explored: Gas expansion, chemical reactions
Activity: Fill the balloon with baking soda. Fill the bottle with vinegar. Attach the balloon’s opening to the bottle’s mouth, then lift the balloon, allowing the baking soda to fall into the vinegar and inflate the balloon.
Materials Needed:
- Baking soda
- Vinegar
- A balloon
- An empty plastic bottle (a 16 oz. soda bottle works well)
- A funnel (optional but helpful)
Instructions:
- Prepare the Bottle:
- Fill the plastic bottle about one-third full of vinegar.
- Prepare the Balloon:
- Using the funnel, carefully add 2-3 tablespoons of baking soda into the balloon. If you don’t have a funnel, you can make one using the top half of a plastic bottle or paper rolled into a cone shape.
- Attach the Balloon:
- Carefully stretch the open end of the balloon over the mouth of the bottle without letting any baking soda fall into the bottle yet. Make sure the balloon is securely attached but keep the baking soda contained within the balloon.
- Start the Reaction:
- Lift the balloon, allowing the baking soda to fall into the vinegar in the bottle. As the baking soda reacts with the vinegar, it will produce carbon dioxide gas.
- Observe the Magic:
- Watch as the balloon begins to inflate from the gas produced by the chemical reaction. Discuss how the combination of an acid (vinegar) and a base (baking soda) creates a gas (carbon dioxide), demonstrating the principle of chemical reactions and gas expansion.
Yeast Balloon
Concepts Explored: Fermentation, gas production
Materials Needed: A small bottle, yeast, sugar, warm water, a balloon.
Activity: Mix yeast, sugar, and warm water in a bottle. Cover the bottle’s mouth with a balloon. As the yeast ferments the sugar, carbon dioxide will fill the balloon.
Materials Needed:
- A small bottle or flask
- Warm water
- Yeast (active dry yeast works well)
- Sugar
- A balloon
Instructions:
- Prepare the Yeast Mixture: Fill the bottle about halfway with warm water. Add a teaspoon of sugar and a packet of yeast. Swirl gently to mix.
- Attach the Balloon: Stretch the open end of the balloon over the mouth of the bottle.
- Observe: As the yeast consumes the sugar, it produces carbon dioxide gas through fermentation. This gas will fill the balloon, causing it to inflate.
- Discuss: Talk about the process of fermentation and the role of yeast in baking and brewing. This experiment demonstrates how yeast cells “eat” sugar and “exhale” carbon dioxide.
Cleaning Pennies with Vinegar
Concepts Explored: Chemical reactions and the properties of acids
Materials Needed:
- Dirty or tarnished pennies
- White vinegar
- Salt
- A shallow dish or bowl
- Paper towels
Instructions:
- Prepare the Cleaning Solution: In the shallow dish, mix a half cup of white vinegar with 1 teaspoon of salt until the salt is dissolved.
- Clean the Pennies: Place the tarnished pennies in the vinegar and salt solution. Let them sit for a few minutes, then remove and rinse under water. If the tarnish is stubborn, you can gently scrub the pennies with an old toothbrush.
- Observe the Change: Notice how the pennies become shinier and cleaner after being soaked in the solution.
- Discuss: Explain how the acetic acid in vinegar reacts with the salt to create hydrochloric acid, which dissolves the copper oxide layer on the pennies, making them shiny again. This experiment introduces the concept of acid-base reactions and the cleaning properties of acids.
Edible Water Bottles
Concepts Explored: Spherification, polymers
Activity: Create an alginate solution and a calcium lactate bath. Drop the alginate solution into the calcium bath to form edible water beads, exploring the spherification process.
Materials Needed:
- Sodium alginate (a natural substance derived from brown seaweed)
- Calcium lactate (a type of salt that can be found in various foods or ordered online)
- Water
- A bowl for the alginate solution
- A bowl for the calcium lactate bath
- A spoon or syringe for forming droplets
- Food coloring (optional)
Instructions:
- Make the Alginate Solution:
- Dissolve 1 teaspoon of sodium alginate in 1 cup of water. If you want to color your water bottles, add food coloring to this mixture. Mix thoroughly until the alginate is fully dissolved. Let the solution sit for a few minutes to remove any air bubbles.
- Prepare the Calcium Bath:
- In a separate bowl, dissolve 4 teaspoons of calcium lactate in about 4 cups of water, stirring until fully dissolved.
- Form the Edible Water Bottles:
- Using a spoon or syringe, drop small amounts of the alginate solution into the calcium bath. As the alginate comes into contact with the calcium, it will form a gel-like membrane, encapsulating the water inside.
- Let the droplets sit in the calcium bath for about 3 minutes to fully form the gel shell.
- Harvest Your Water Bottles:
- Gently remove the formed water bottles from the calcium bath using a slotted spoon and rinse them in a bowl of clean water.
- Discuss the Science:
- Talk about the process of spherification, a culinary technique that uses the reaction between sodium alginate and calcium to create a gel. This experiment is a fun way to explore concepts of chemistry and molecular gastronomy.
Homemade Butter
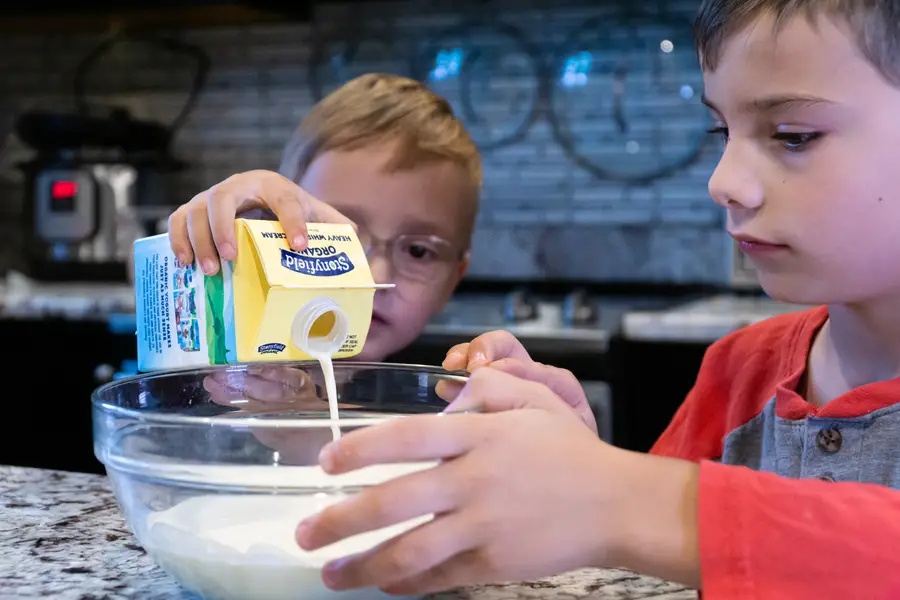
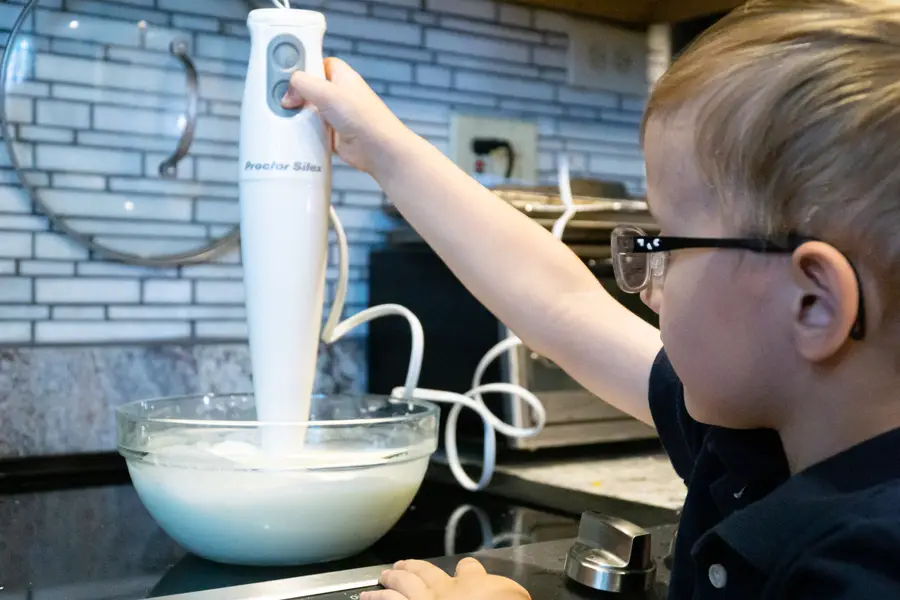
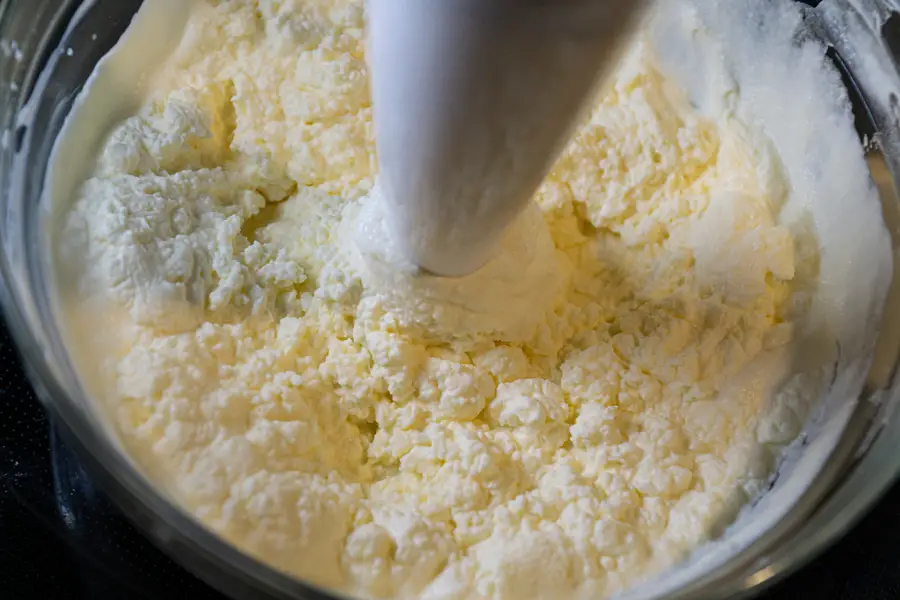
Concepts Explored: Emulsification, phase change
Materials Needed: Heavy cream, a jar with a tight-fitting lid, salt (optional).
Activity: Fill a jar halfway with heavy cream and shake vigorously until the liquid (buttermilk) separates from the solid butter. Drain the liquid, and you have homemade butter!
Materials Needed:
- Heavy cream (cold)
- A jar with a tight-fitting lid
- Salt (optional)
Instructions:
- Prepare the Cream: Fill the jar halfway with cold heavy cream. If you like, add a pinch of salt for flavor.
- Shake It Up: Secure the lid tightly on the jar. Shake the jar vigorously. After several minutes, the cream will thicken and form whipped cream. Keep shaking until you hear and feel a solid lump form inside the jar; this is your butter separating from the buttermilk.
- Rinse the Butter: Open the jar and pour off the liquid (buttermilk), which can be saved for other recipes. Transfer the butter to a bowl. To wash it, pour cold water over the butter and gently press out any remaining buttermilk with a spoon or your hands. Drain the water and repeat until the water runs clear.
- Discuss: Talk about the process of emulsification and how agitation changes the structure of the cream, causing the fat molecules to clump together and separate from the liquid. This experiment is a delicious way to explore physical changes and the science of food.
Ice Cream in a Bag
Concepts Explored: Freezing point depression, states of matter
Materials Needed: Milk, sugar, vanilla extract, ice, rock salt, small ziplock bags, large ziplock bags.
Activity: Mix milk, sugar, and vanilla in a small bag and seal it. Fill a large bag with ice and rock salt, then place the small bag inside. Shake until the mixture solidifies into ice cream.
Materials Needed:
- Half and half (or milk and cream)
- Sugar
- Vanilla extract
- Ice
- Rock salt
- Small zip-lock bag
- Large zip-lock bag
- Gloves or a towel (to protect hands from the cold)
Instructions:
- Mix Ingredients: In the small zip-lock bag, mix together 1 cup of half and half, 2 tablespoons of sugar, and ½ teaspoon of vanilla extract. Seal the bag tightly.
- Prepare Ice Bath: Fill the large zip-lock bag halfway with ice and add ½ cup of rock salt. The rock salt lowers the freezing point of ice, causing the ice to melt and absorb heat from the surroundings (including the ice cream mixture), which freezes the cream.
- Combine Bags: Place the small bag with the ice cream mixture inside the large bag with ice and salt. Seal the large bag.
- Shake: Shake the bags vigorously for about 5-10 minutes. Use gloves or a towel to protect your hands from the cold. The mixture will thicken and freeze into ice cream.
- Enjoy: Remove the small bag, wipe off the salt, open it carefully, and enjoy your homemade ice cream.
You can also make homemade Ice cream in a can.
Glowing “Rubber” Egg
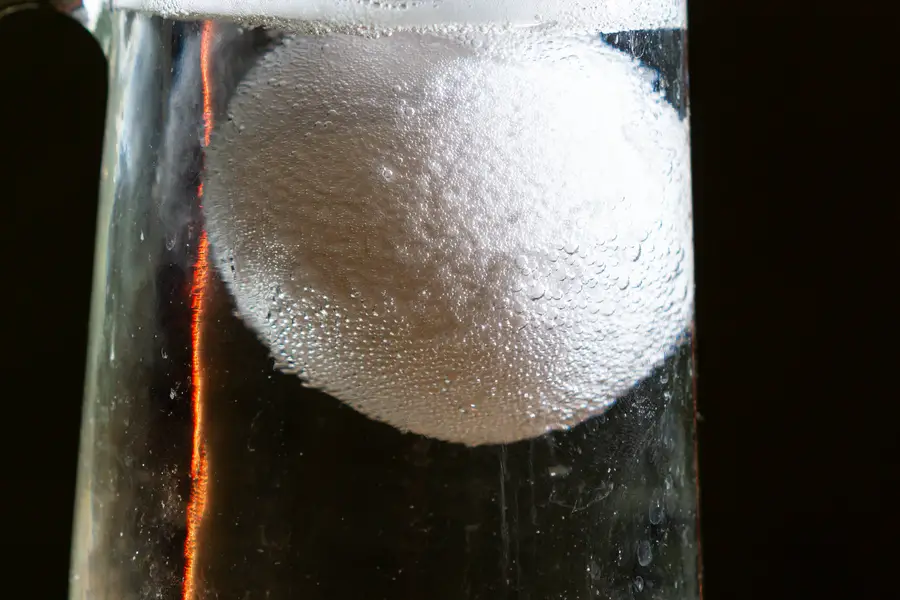
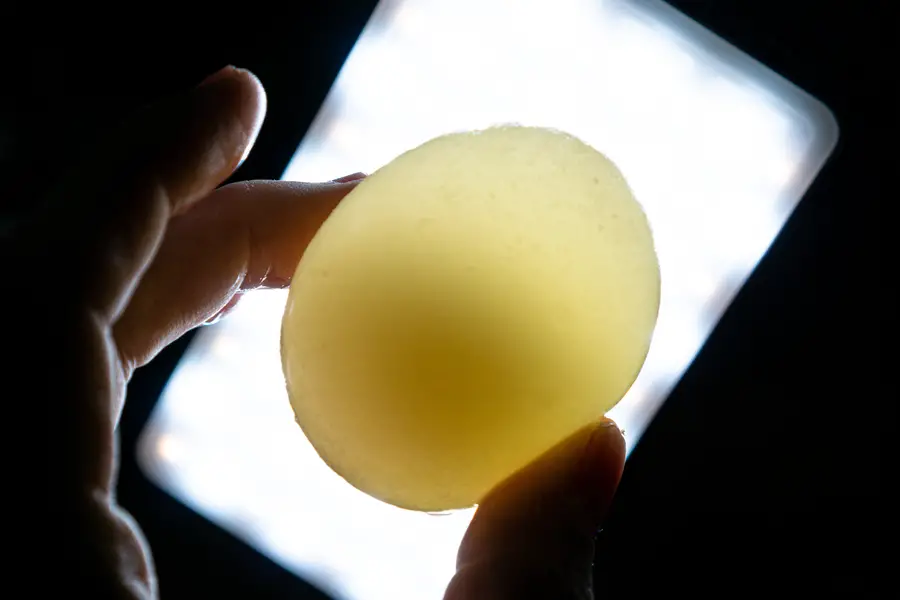
Concepts Explored: acid-base reaction
Materials Needed:
- Raw egg
- vinegar
- A Jar or Glass
- glow-in-the-dark paint or a fluorescent marker
Activity: Soak a raw egg in vinegar for 24-48 hours until its shell dissolves, leaving a rubbery, translucent membrane.
Instructions:
- Fill jar or glass with vinegar
- Drop the egg in the vinegar
- Let the egg soak in the vinegar for a few days
- Observe the bubbles forming on the eggshell. This is carbon dioxide gas created from the chemical reaction of the vinegar and the egg shell
- Drain and add vinegar as needed until the eggshell dissolves
Homemade Lava Lamp
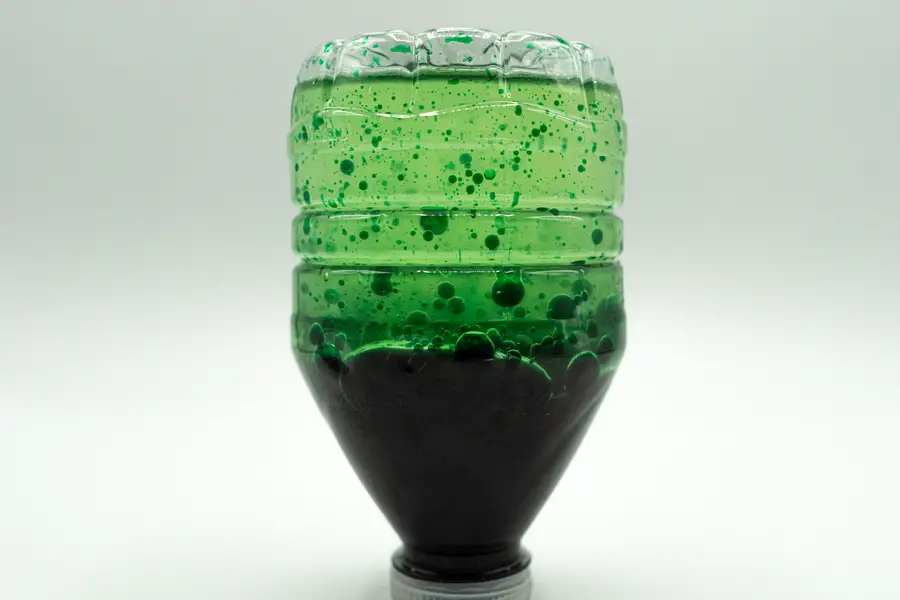
Concepts Explored: Density, immiscible liquids, solubility, and chemical reactions
Activity: Fill a bottle ¾ with oil and the rest with water. Add a few drops of food coloring. Break an effervescent tablet into pieces, drop one in, and watch your lava lamp bubble.
Materials Needed:
- A clear plastic bottle or a glass jar
- Water
- Vegetable oil
- Food coloring (we used green)
- Alka-Seltzer tablets (or any effervescent tablet)
Instructions:
- Prepare the Lava Lamp: Fill the bottle or jar about one-quarter full with water.
- Add Oil: Pour vegetable oil into the bottle until it is almost full, leaving some space at the top. Wait a few minutes for the oil and water to separate completely because oil is less dense than water and does not mix with it.
- Color the Lava: Add a few drops of food coloring to the bottle. The drops will pass through the oil and mix with the water below.
- Create Lava: Break an Alka-Seltzer tablet into a few small pieces and drop one piece into the bottle. As it reacts with the water, it will create bubbles of carbon dioxide gas that rise through the oil, carrying colored water with them. When the bubbles pop at the surface, the colored droplets sink back down, creating a lava lamp effect.
- Discuss: Talk about the principles of density and solubility that cause oil and water to separate, as well as the chemical reaction between the Alka-Seltzer and water that produces gas.
You can simply shake the bottle and let the water and oil mix, then watch them separate again.
Cabbage pH Indicator
Concepts Explored: Acidity and alkalinity, acid-base reactions, and pH indicators
Activity: Blend or boil red cabbage and strain to create a purple indicator solution. Test the acidity or alkalinity of various liquids by adding the cabbage juice and observing the color change.
Materials Needed:
- Red cabbage
- Water
- A blender or knife and a way to boil water
- Filter or strainer
- Clear glasses or cups
- Various household substances to test (e.g., vinegar, baking soda solution, lemon juice, soap, etc.)
Instructions:
- Extract the Indicator: Chop the red cabbage into small pieces and place them in a blender. Add water to cover the cabbage and blend until you have a smooth mixture. Alternatively, you can chop the cabbage and then boil it in water for about 15 minutes.
- Strain the Mixture: Strain the cabbage mixture to separate the liquid. This liquid, which will be a purplish color, is your pH indicator.
- Prepare the Test Samples: Fill several clear glasses or cups with a small amount of different household substances you wish to test. Try using lemon juice (acid) and baking soda (base) to along with some other items.
- Add the Indicator: Pour some of the cabbage juice into each glass. Observe the color changes.
- Interpret and discuss the Results: The cabbage juice will change color depending on the pH of the solution it’s mixed with. Acidic solutions will turn it pink or red, neutral solutions will remain purple, and basic (alkaline) solutions will turn it green to blue.
-
- The lemon juice should turn it pink (acidic).
- The baking soda solution should turn blue-green (basic)
- How did your other items turn out?
Wrap Up – Kitchen Chemistry Experiments
These activities not only provide a hands-on learning experience but also demonstrate the relevance of chemistry in everyday life, from the food we eat to the biological processes around us. They encourage curiosity, observation, and analytical thinking in a fun and accessible way. If you’re interested in more kitchen science experiments, check out our posts on STEM and Cooking and Experiments with Food!
